
Once you’ve determined that you need a custom pool safety cover, the next step is measuring your pool to ensure a proper fit. The basic shape of your pool will classify it as either a “Type 1” or “Type 2” pool.
At In The Swim, a Type 1 pool is basically a modified rectangle. Grecian, L-shaped and bowed end pools would all be classified as a Type 1. They generally require basic measurements.
A Type 2 pool is more complex and would include oval, kidney, lazy L, or freeform pool shapes. To ensure the proper fit of your mesh safety cover on a Type 2 pool you need to use a method called A-B measuring, or Triangulation.
For an instant estimate on a custom safety pool cover before doing A-B measurements, just visit our Safety Cover Instant Estimate page.
To A-B measure your pool, gather these materials:

- 100-foot reel-type measuring tape, as shown.
- Two thin stakes or very long screwdrivers.
- Helper with neat handwriting.
- Chalk or duct Tape.
- Measuring form.
Set Your Stakes

Rebar or wood stakes, or very long screwdrivers, will establish the “A” and the “B” points from where you attach the measuring tape and measure to all the points around the pool. The stakes need to be at least 20 feet apart, or about 2/3 of the length of the pool. Choose the side of the pool that is either easier to stake in the dirt or allows for the easiest, unrestricted measuring.
Place the stakes parallel to the pool, at least 4 feet from the edge. An imaginary straight line between your A and B stakes must not intersect the pool and should be at least 2 feet behind any curve of the pool. Firmly place the stakes into the ground so there will be no movement while you are pulling the measuring tape taut.
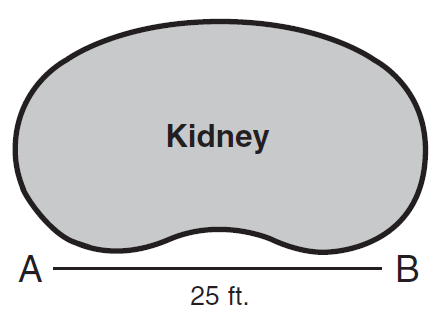
In the kidney-shaped diagram above, the areas of the kidney that bulge down toward the line must be 4 feet from the line. It is OK for the line to be more than 4 feet away. It is important to record the distance between stakes A and B. If you do not correctly state the distance between the two points the rest of the measurements you take will not triangulate correctly.
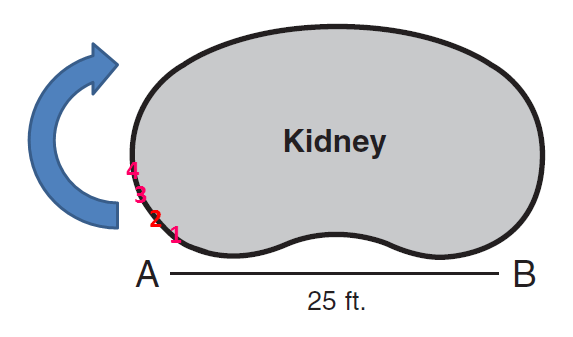
When you mark and number your points around the inside edge of the pool coping in a clockwise manner, begin in an area near the point A you have established. You can use strips of duct tape or use chalk. It can be useful to write every fifth number on the tape or in chalk below the point.
Points on curved areas should be spaced at a maximum of 2 foot intervals and should be about 1 foot apart in tight radius areas. Be sure to include all corners and direction changes as points as well as any obstructions within 18 inches of the pool’s edge (slide or diving board legs, ladders, hand rails, rocks, planters, etc.).
Mark Your Points

Using chalk or small strips of duct tape, mark points along the inside edge of the pool coping every 24 inches or so, no need to be exact. For sharp radius corners, place a point every 12 inches. Number every fifth point with a pen on the duct tape strips, or with chalk behind your points (i.e., 1, 5, 10, 15).
Most freeform pool shapes will have 50-60 points, while modified rectangles (e.g., Roman, Grecian, L shapes, oval, or rectangles with attached spas, steps or swimouts) may have 30-40 points. Check the weather, tape and chalk don’t do so well on wet coping.
Be sure to place a point at all corner points, direction changes and non-removable objects like planters, rock features, slide legs, diving boards or fountains that are within 24 inches of the pool’s inside edge.")
Next step is to draw a diagram like the one shown above to show the inside dimensions of your pool, onto the grid area of the measuring form and all of the points around the pool.
Don’t worry if it’s not exact or pretty, just try to make the best representative shape that you can. Show any areas without a pool deck as well as any non-removable objects within 2 feet of the pool. The more detail the better!
Below or above the drawing, be sure to show the location of your A and B anchor points. Measure between the two and write this measurement on the pool drawing and in the space provided on the safety cover measurement form.
Carefully mark up the drawing with all of your points, numbering every fifth point or every point in tight radius areas like swimouts and spillways. As you do this, double check the numbering of the points and the total number of points around the pool.
Measure Your Pool

Your cover designer will catch most measuring mistakes that produce odd shapes or inconsistencies, but maybe not the small mistakes of a few inches, so measure carefully. Round your measurements up, to the nearest inch, and do so consistently throughout the measuring process.
With your helper seated or following you with clipboard and a black ink pen, you can now begin to A-B measure the pool for a safety cover.

Attach your measuring tape to stake A,and measure the distance from stake A to point 1, then to point 2, and so on, all the way around the pool. Then, move the measuring tape to point B and starting again at point 1, measure to each point all the way around the pool.
Call out your measurements to your helper loud and clear, and have them repeat it back to you as they write the measures on the measurement form, in a legible and consistent format.
After you have measured from stakes A and B to all the pool points, measure the overall length and width of the pool, and record this on the form. Then take three-four other cross pool measurements. These are used to double check overall measurement integrity.
 After you finish taking all of the A-B measurements, provide some check points of the overall length and width of the pool by choosing numbered points that are at the approximate overall length of the A and B points you created are not used for the cross-check measurements. These measurements will be used as by the custom pool safety cover manufacturer to help validate the other measurements.
It is important for you to provide a diagram of your pool showing the shape, numbered points around the pool, and any obstructions around the pool within 18 inches of the pool’s edge. The drawing need not be perfect, but close to the pool shape. Indicate any areas where you have less than 3 feet of concrete extending out from the pool’s edge. Pictures of the pool along with measurements are needed for obstructions or deck level changes.
10 Tips to Measure a Pool for a Safety Cover
1. Most instructions for measuring the pool will say to use chalk, but I prefer to use small strips of duct tape. Chalk can take weeks or months before the rain washes it away. But you do need dry coping, it won’t stick well to wet.
Unroll about 12 inches of duct tape, then tear again twice lengthwise, into three long 1/2 in. strips. As you walk around the pool, tear off 2-inch long strips and stick them firmly just over the inside edge of the pool coping. Only stick the back half of the tape strip to the pool coping, leave a front tab unstuck; it makes it easier to remove the tape after measuring.
2. Write every fifth number on the back half of the duct tape pieces with a Sharpie pen, starting with number 1, then 5, 10, 15 … and ending with your final point, adjacent to your number 1 point. This step is important for good reference and help making your drawing, and for best communication with your helper writing down the numbers.

3. For your A-B stakes, you can use a piece of 3/8 inch steel rebar or wooden dowel, or garden stakes. A long (15-18 inch) Phillips screwdriver can be used. It’s best to have a narrow stake, so that you can slip the metal end of the measuring tape over the end of the stake, and it will swivel as you move the tape around the pool. You could also use larger wooden stakes pounded into the ground, with a nail on the top. A safety cover hex key also makes a very nice stake for A-B measurements.
4. The location of your A-B stakes is an important choice. Choose the side opposite any water features, boulders or obstructions and the side that makes it easiest to move the measuring tape around the pool, without having to wrap around any poles or rocks or navigate deck level changes. Choose a location with some soil areas for the easiest placement of your stakes. In cases with no soil, use a tall flathead screwdriver, lightly pounded in between concrete slabs or deck drains. If that is not available, you can make duct tape “X” marks on the concrete and have the helper hold the tape end on center of X for each measurement. A and B stakes should be separated by at least half the length of the pool, or about 20 feet apart for most pools, and 3-5 feet from the pool edge. A straight line drawn between points A and B can never intersect the pool.
5. Whichever type of stake you use for your A and B points, make sure they are placed firmly and deeply into the ground, so they won’t lean or move when you are pulling the tape from across the pool. And, don’t overdo it either and pound stakes too deeply, if there is a possibility of pool plumbing pipes within a foot of the surface. If possible, leave the stakes in place (or mark the spots) until after your measurements have been approved, just in case there is a need to double check some measurements.
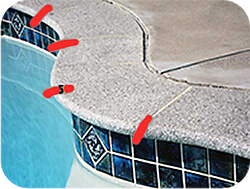
6. On curves and irregular points, take measurements to points at the beginning, apex and end of the curve, or every 1-2 feet. On straight runs of pool wall, you can set points 3-4 feet apart. Measure 90 degree corners, at the corner. Non-removable obstructions within 15 inches of the pool edge should also be marked. These may include rails, spillways, fill spouts, slide legs, rocks or boulders, deck level changes or anything that is not removable for winter and is within 1-2 feet of the pool edge.
7. Always round up or always round down to the nearest inch, as you shout out your measurement to your helper. Have them shout it back to you as they write it down, to improve accuracy. Every fifth measurement, call an audible on the point number (that you wrote on the duct tape), such as “and for point number 5, we have … “
8. If you end up with your A measurements having more points than you have in the B column, or vice-versa, that means you either skipped a point, or measured a point twice. Work backward and remeasure every fifth point, until you find the area where the mistake occurred, then find the point that was missed or duplicated.

9. Most measurement mistakes are caught by the manufacturer, because they produce mathematical inconsistencies or make the shape of the pool unlikely or impossible. Email pictures for raised walls, water features, planters or cutouts, or areas of less than 3 feet of decking. The important information page is designed to help you answer the important questions about any unusual pool features, as well as provide the cross-measurements, which serve as a double-check on the accuracy of the point to point measurements.

10. Drawing the picture of the pool on graph paper may test your art skills, but it need not be perfect. Use a pencil and draw lightly, as you may want to erase and correct some of the curves. When the picture is a close representation of the pool shape, carefully make small marks around the edge lightly in pencil, to represent each point, and also draw in the location of your A and B points. Number every fifth point on your drawing and show the location of any obstructions, walls, steps or other features.
If you are replacing an existing cover, you can also measure to each existing anchor, but in most cases, not every safety cover anchor will line up with every strap; many may need to be redrilled. When the picture and points are drawn in to the best of your ability, use a pen to darken the drawing and numbers if needed.
Hopefully you are now comfortable taking the measurements needed for your custom safety pool cover. I think you’ll find that if you take the process one step at a time you will have success with it in the end. If you have any questions please give us a call, we have experts on staff that would be glad to assist you. Happy measuring!
To get an instant estimate on a custom safety cover, without all of the pesky A-B measurements, just visit our Safety Cover Instant Estimate page.


