Those with DE filters are probably extremely happy with the quality of water that a DE filter creates, but there comes a time when you will need to replace the filter grids. This is usually after 7-10 years of hard work. The filter grids may develop holes or become unstitched and clogged with oils and minerals.
You could replace the entire grid assembly, which is all of the grids, the top manifold and the bottom spreader plate, all bolted together. Order the grid assembly for your make, model and size. It comes assembled to drop right in the tank.
Or, you can replace just the DE grids, for less than half the cost of replacing the entire assembly. This blog post is about how to replace DE filter grids yourself. You don’t need any special tools, just a wrench to remove the filter clamp band. Let’s try to make replacing DE filter grids a little less scary.
6 Steps to Replace theGrids in Your DE Filter
- Open the filter
- Remove the assembly
- Disassemble the assembly and discard the used grids
- Reassemble the assembly with the new grids (upside-down!)
- Place the assembly back inside and close the tank
- Add the DE powder
That may sound overly simplistic but those are really the only things that you need to do to replace your DE grids.
1. Open the Filter
Before doing anything else make sure your pump system is turned off. The last thing you need when taking apart a filter is water spraying everywhere. Most DE filters have a band that holds the top to the bottom that can be loosened with a socket wrench.
Once the brass nut it loosened completely off the screw, the band can be removed from around the filter tank halves. Open the air bleeder a few turns to reduce the pressure and allow the water to drain out of the tank.
You may need a large, flat screwdriver to help pry to clamp band off the tank and to assist in separating the tank halves. When the lid is popped off, carefully and gently set it aside.
2. Remove the Grid Assembly
You may need two hands to lift the grid assembly out of the tank. You may see two areas that say “lift here” on either side of the manifold.
You should have already backwashed the filter before removing the filter lid. This removes most of the DE powder. If the assembly is heavy, use a hose to spray off more of the DE powder, especially in between the grids, before lifting it out.
Place the assembly on a soft area to protect the top and bottom of the assembly. Try not to let it fall over or it may crack the top manifold. Take some time to inspect the manifold and lower spreader plate for any cracks or damage. Be sure that the air bleeder sock, or strainer, is intact, located on top of the manifold.
3. Disassemble the Grid Assembly
Remove the nut(s) on the top manifold and then gently pull off the top. Then the filter grids can be pulled out of the bottom and discarded. Identify the hole in the manifold where the small grid connects and make note for when you replace it.
Be sure that the plastic tips of the grids do not snap off inside the manifold when removing them. No problem if they do, just pluck them out with your fingers or pliers so that the new grid will fit into the hole.
Leave the long bolt(s) through the bottom piece to prevent losing or misplacing it. The nuts that are threaded onto the bottom of the bolts should lock into the underside of the spreader bottom plate.
4. Reassemble the Assembly With the New Grids
Start to reassemble grids by placing the top manifold on the ground, facing up. Reassembling it upside-down will allow is much easier, trust me! Using two small bricks makes it easier to keep it steady, without damage to the manifold or air relief.
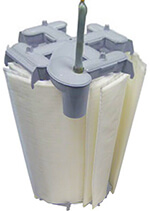
Place the partial grid (aka small grid) first in front of the assembly to make room for the standpipe. Then push the remaining grids into the manifold. When they are all in, it will look like the picture above.

Now take the bottom spreader or bottom plate and work it over the grids, lining up the cut-out in the bottom plate for the standpipe. This cutout will line up directly above the hole in the top manifold that connects to the standpipe.
It may take some finesse to align the tabs of the bottom spreader plate to their proper location between each of the grids. These tabs work as spacers to keep the grids all separated or spread out. Work with it until it looks symmetrical. A slight twisting motion will help seat the plate down close to the grids.
Tighten down the through bolts slowly and carefully to pull the top and bottom together tight onto the new filter grids.
5. Reinstall Grid Assembly, Close the Tank
Place the assembly back in the tank carefully as to not break any parts. Clean and lubricate the belly-band O-ring with a water-based lubricant to create a water tight seal. Place the lid back on the tank and reinstall the band.
Make sure that the clamp band is aligned properly, covering both halves of the filter tank. Tighten down the nut on the clamp band with a proper size wrench, until the spring of the clamp assembly is compressed tightly and all coils of the spring are touching the coils next to them.
6. Add the DE Powder
Finally, turn the pump back on and add the DE Powder or Aqua Perl into the skimmer. Add a full charge, which is usually 1 pound of DE powder per 5 square feet of DE filter surface area. If you have a 36-square-foot filter, use seven 1-pound scoops.
If you see any DE powder coming back through the system, the grid assembly may not be tight enough, or the air bleeder is missing on the top of the manifold.
Thanks for reading this blog post about how to replace DE filter grids. I hope that it motivates you to renovate your DE filter by replacing your own grids.


My purex cylinder is 12″ across and uses 8 24: grids bottom manifold…SM 830?….35 SF. I need 8 grids and bottom manifold and top spreader
Hi Bob, unfortunately the Purex 800 series DE filter grids and manifold have been made obsolete and are no longer produced. 🙁
[…] maintenance items include annual lubrication of O-rings, or replacement of filter media [sand, grids, cartridges] every 5 years or so; which can be DIY friendly. Pumps and heaters can go for 10 years […]
[…] to break down and develop holes or rips. When one goes, the others will soon follow. Brett wrote a post with great pictures on how to change DE filter grids in 6 easy steps, but here’s the 5-step […]