
A slide is a fun addition to a pool. You will know where your kids are because they and their friends will be all at your home. What better way to keep track of them and keep them out of trouble?
If you are building a new pool and decide you want a slide, this is quite easy because you would install the slide while doing the installation. Sometimes you decide you want a slide but cannot afford it at this time. You can have the plumbing set up to add a slide and when you have the money, you can just add the slide. If you move into a home that has a pool and decide you want to add a slide, that is not a problem either.
3 TYPES OF POOL SLIDES
Before you rush out and buy a pool slide, you will want to do a little research. There are basically three different slide categories, based on how they are attached to the deck. Check the footprint of the slide you are interested in. The footprint is how much space you need to install the slide legs and ladder. You need to make sure you can use the slide you choose on your pool, in terms of its footprint and your water depth. Each slide also has its own weight capacity, from 200-275 pounds, which could be an important factor.
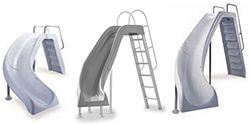
Straight leg pool slides are the first group. This includes the City II, White Water and the Wild Ride slides. These slides have an open or closed stairway. If you have small children the closed stairway would be much safer. The weight capacity on these slides ranges from 225-250 pounds.
These pool slides have some small flexibility in their placement, as long as your water depth and overhang are in agreement with the Water Safety Envelope. Because of this the footprint will vary, from 12 feet by 5 feet to 8 feet by 8 feet, depending on the orientation that you install the slide, see right.
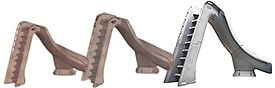
Molded slide legs are another group. These slides would be the 8-foot-tall Turbo Twister, Typhoon and the Cyclone. The Cyclone comes in the right turn only while the Twister and Typhoon have left or right turns. These slides have enclosed stairways, rather than the traditional open ladder, which is generally safer for kids.
The footprint on these slides ranges depending on the model; the Twister footprint is roughly 13 feet by 7 feet, and the Typhoon is 12 feet by 5 feet. The smaller Cyclone Fun Slide only needs roughly 5 feet by 7 feet of pool deck space and 42 inches water depth (most other slides require 48 inches water depth). The weight limit on these slides ranges from 250-275 pounds.

Elephant leg slides are the third group of pool slides. This would include the G-Force and the X-stream slides. The G-Force has a circular 360-degree design while the X-stream comes in left or right turn. The G-Force 360 slide has a much smaller footprint (9 feet by 7 feet), requiring much less deck space for mounting. The X-Stream slide is large and needs about 14 feet by 9 feet of deck space. It has a 250 pound weight limit.
COLORS: When checking out the different slides, you will want to be aware that each slide has different colors. They do not all come in the same color and this may help in deciding the slide you want to buy and install.
FOOTPRINT: Before you can choose a slide you need to see how much room you have to place the slide. Each slide has a different footprint (amount of deck space needed for installation). Each slide also has a unique Water Safety Envelope. This includes how deep the water has to be at the end of the slide, how much overhang on the edge of the pool, and how much clearance (and depth) is required in front of the slide exit.
WATER DEPTH: Basically, slides must be installed over a water depth of 36 inches, which quickly drops to 42-54 inches. All slides have different specs, but most Water Safety Envelope requirements will require the slide be installed on one of the long sides of the pool, in the mid-depth section of the pool between the shallow and deep end. It can’t be too shallow or too deep. Read the spec sheet for each pool slide you are considering to find exact depth measurements.
WATER SAFETY ENVELOPE
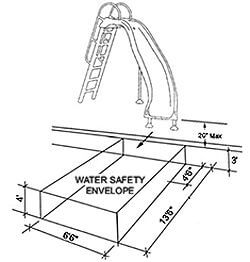
This is the space in front of the slide exit: the overhang of the slide deck, the depth of the water at the point of entry. The water safety envelope is very important to follow to make sure that the slide is installed safely to reduce the chance of injury. Be sure to read the placement information carefully before ordering a pool slide, as each slide has its own restrictions on where it can be placed on your pool.
- The slide overhang is a specific distance.
- The height above the water is also specific.
- The water depth at slide entry is very specific.
- The walkway around the slide must also be safe for traffic.
Check the water depth at the edge of the pool and also 6 feet from the edge of the wall to be sure of depth.
POOL DECK TYPES
No doubt about it, pool slides take up a lot of room, a large footprint. Also consider the traffic to and from the slide. It should be roomy enough for several people to safely line up. The deck surface should be non-skid and well drained. The Cyclone and G-Force are the smallest, but if you discover that more deck space is needed, there are a few things you can do.

If you need more deck space, you may be able to add to your deck area, or you can use pavers and secure the slide into pavers (consult the manufacturer’s instructions). Pavers will have to be secured correctly, usually placed into a deep cement pad poured onto a bed of gravel. This heavy concrete pad can be used instead of enlarging the deck, in most cases, especially for smaller slides.
Most pool decks slope a little so that water will run off the deck. Usually the slope is very slight, at 1/4 inch per foot, but if your pool deck has slipped or was poured with an aggressive pitch, you may need to make adjustments during installation.
Your pool deck must be a solid surface; it can’t be loose pavers or wood. Especially for the larger size slides, make sure you have a solid footing underneath. If you’re uncertain, give us a call or send some pictures.
POOL SLIDE INSTALLATION
TOOLS: The following tools are needed for most slide installations:
- Socket wrench set, pliers and vice grips
- Rotary hammer drill, regular hammer
- Screwdrivers, hex key set
- Measuring tape, carpenter’s level
LABOR: Two people would be great to have on hand to install a slide. The hardest part will be lifting the slide into place. With two people you are looking at about 4-8 hours to build the slide, anchor it and hook up the water line.
INSTALLATION: First read the installation manual and the owner’s manual for the slide. Once you taken some deck measurements and calculated the near exact position, you can assemble the slide. Each slide is a little different to construct; just follow the manufacturer’s instructions.
The way a slide attaches may be a little different. For the most part you mark where you are going to place slide, using a measuring tape and chalk or paint. Before drilling any holes, double check all measurements for the overhang of the flume or lip of the slide.
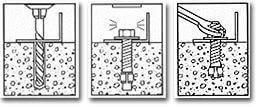
You can use the ladder anchor or the assembled slide as a template for drilling the holes. Mark the anchoring holes with paint or a marker. Drill the holes, clean out the dust and insert your deck bolt. The deck bolt will come up through the deck into the slide. Nuts are then used to tighten the slide ladder, legs and feet to the pool deck. Slides come with the hardware needed to bolt your slide into a concrete pool deck.
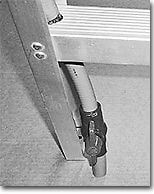
WATER SUPPLY: Slides usually use the water supply from the pool. If that is not a possibility there are some hookups that can be done by a hose; however, larger slides generally require more water flow than you get from a garden hose. Each manufacturer and slide has different options when hooking up the water supply, but most come up under the ladder, as shown in the picture.
When adding the water supply you will need to connect a hose that comes with the slide upon the under side of the slide and install a ball valve to connect the water to the filter. If the slide is installed on a brand new pool, the plumber can plumb the slide line in advance. If you are installing the slide later, you will need to plumb the slide water line from the pool’s return line. An existing deck can be cut to add a water line up to the best point under the slide.
TIPS: Double check to verify the slide overhang and the depth of the water are both correct. Follow all manufacturer instructions, and if you have any questions, give us a call. We are happy to help. During slide assembly, make sure all the screws are tightened up and the connected slide sections are flush and very snug.
Swimming pool slides are great fun and safe when correctly installed and used. If your pool is an active pool, few accessories bring more smiles than fast pool slide. If you have questions or concerns about installing a pool slide with your in-ground pool kit or installing your own slide years later, contact any one of our pool experts. We are here six days a week and love to help you improve your pool!


Hi. My deck is short of what’s recommended for the turbo twister. I would need to add roughly 13-14 ft of length by 4 ft wide more of concrete. Currently we have the length but just short of the 7 ft
My question is, instead of using all that concrete, could I just use what I need to accommodate the 2 footprints?
Mark, I suppose you could, but it would not be safe. What would prevent that small concrete pad from lifting out of the ground? And where would your users walk – thru the dirt and grass, or mulch? It could work if the pad was large enough and deep enough (very deep) and built to withstand pressures – but if you are doing all that, it will be cheaper just to pour a larger deck. Finished concrete is under $5 per sq. ft.
Hooked up water supply but pool pump won’t pump the water up the pool slide?
Hi Lori, not sure of your set-up, but water will choose the path of least resistance, so if it can choose between a 1.5″ pipe at ground level, or a 1″ pipe traveling up 6 ft, it will take the first route. You will need a valve, perhaps a 3-way valve, to restrict the flow to the pool just enough to push the water up to the slide. If you just have a Tee fitting now, replace the tee with the valve. Of course, there could be some other issue, I’m just guessing, because of the scant information provided.