The first thing you want to do before any digging an inground pool in your yard is make a call to Dig Safe. In some areas it may be called something different like Call Before You Dig or some other name, but this is a law. If this is not done, not only is it not safe but if you hit some utilities underground you will be fined and be responsible for the repair cost.
1. Check for Underground Concerns
There is now a national Call Before You Dig line, just call 811 to reach this free service. Usually within 48 hours, they will have a county official come to your property and mark all of the underground utilities. They use a different colored paint for gas, electric, water and cable.
Sprinklers
Before you dig your pool, check for things such as underground sprinkler lines that possibly can be either removed from the area or at least remove the sprinkler heads, as they are the most expensive parts. You may want to mark on a plot plan where each of the heads you removed goes, to make it easier to find when construction is done.
Septic Fields
Leach fields for a septic tank may have been shown in a different area on the plot plan at your city or town but were actually installed right where your proposed pool is going. This happens occasionally when the contractor changed the location and never changed it with the town. In older communities, you may encounter long forgotten leach fields, built before city water and sewer was brought to your area.
Tree Roots
Things such as trees should not be near the pool area for a few reasons. Eventually the root system may work its way towards the pool and undermine the pool liner. Also, leaves or pine needles falling from the tree into the water can be a headache. Shade from trees will keep your water cooler, which can raise heating costs.
Boulders
You may encounter boulders the size of bowling balls, no problem. But if you find very large boulders, a skilled excavator can maneuver them out of the ground in most cases. If it is too big for the bucket size, large boulders can be strap lifted out of the pool. They can then become part of your post pool construction landscape.
Water
When you dig a pool, hitting water is fairly common. Depending on where you hit water and how it is coming in, there are different solutions to handle the water.
If you dig a pool to 8 ft deep and you hit water at the 7 ft mark, what you would do is over-dig the bottom floor. Dig into the side slopes 1 ft more and 1 ft deeper in the bottom depth, making your 8 ft deep end – 9 ft deep. Have a few yards of gravel delivered, enough to bring the level back to your 8 ft depth. Sometimes this will be enough to fix the problem and allow the pool construction to continue. You may have to put a sump pump in the bottom to keep out the water if the stone alone does not work.
In more extreme water problems a french drain may need to be installed. This is an 3 or 4 inch under ground drainage pipe, buried in the stone at the deepest point. The drain pipe runs out of the pool (under walls), and connects to a self priming pump outside the pool. If you have to do this you would keep the pump running until the pool is built and full of water and only at that point can you shut the pump off.
2. Mark the Area, Remove the Grass
Before you start the dig process you want to stake out your pool to know exactly what and where to dig. First, mark the over dig area – this is generally 5 ft longer and 5 ft wider than your actual pool size – with paint or flour, something you can see. For example, if you have a 16 x 32 pool your over dig would be 21 x 37.
Some rental shops have a sod cutter machine that you could use to replant your grass in another area, if you wish. You definitely want to keep the topsoil, or the first 6-12″, which is of better quality than the deeper dirt.
Going one step further with this, let’s say you are looking to build a concrete pool deck around your pool, 4 ft on the long sides and the deep end wall and 10 ft behind your shallow end, walk-in steps. Adding up your width, we have 23′ for pool and bracing + 8 ft of decking for a total width 31 ft. For length, we have 45′ + 14′ of decking. 59′ total. Mark out the overall 31′ x 59′ area with lime or paint or 4 stakes and string lines. This area includes any planned decking.
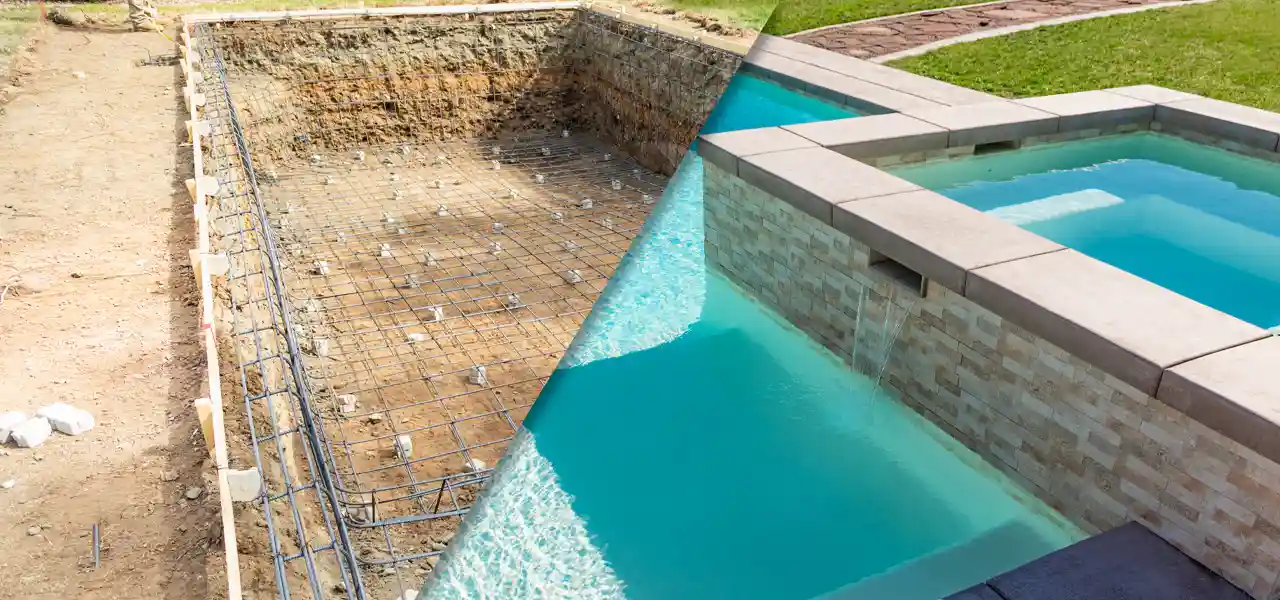
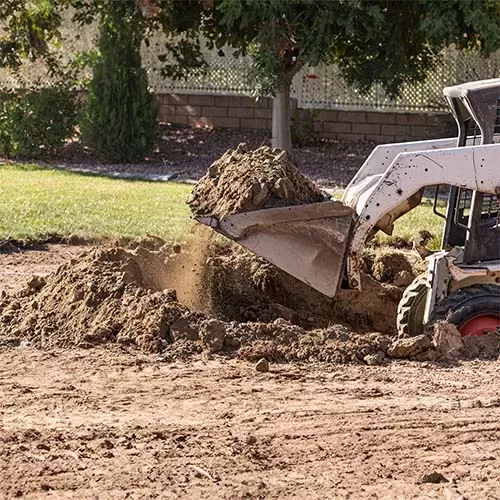
3. Dig the Shoebox
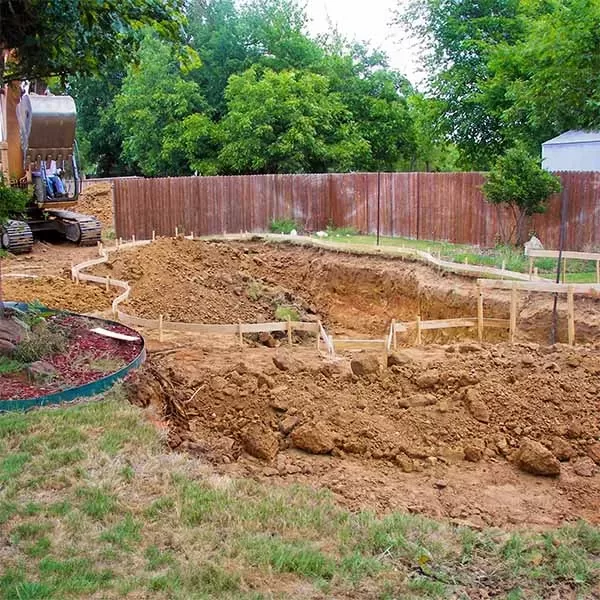
Once you have stripped the top soil you can start digging down to a flat, shoebox shape, 42″ deep (the wall height of the pool). You will end up with a large hole 5 ft longer and wider than your pool size, and a flat and even 42″ depth overall.
Dig the area down to the shallow end depth all throughout the pool area. You will also need to make this area level, so it may be different depths around the pool if the yard has a slope.
You can dig this part of the pool using a front loader, or a small Bobcat type of skid steer loader. A skilled operator will have an easier time than one who is not, however, if there is room to move around, even amateurs can successfully dig a pool.
4. Stakes & Strings
Once you have the ‘shoebox’ dug, it’s time to stake out your pool. Measure in 2.5 ft in from the over dig all the way around. Using our 16×32 pool size example, square up the 16 x 32 pool area within the 21 x 37 over dig area. Place a pin or stake in each of the 4 corners and a string line all around to make up your pool.
Locate the Break
From the shallow end on our 16 x 32 we measure down the 32 ft side – 8 ft, (from points 5 to 4 and 6 to 7). This is the end of our shallow area, known as the “break” from the shallow section to the sloped section. Run a string line across the pool, from point 4 to 7, now we have our shallow end located.
Locate the Hopper
The slope length is 14 ft, so we measure at the base of the wall from point 4 to point 3, and then the opposite side, from pt 7 to pt 8. Put a pin on each side, just below the wall (indicated by the red dots). This is where our slope ends and the hopper pad or the flat bottom begins. Run a string line across the pool, from point 3 to point 8.
Now we measure 6 ft along the base of the wall, from point 3 to 2, and from point 8 to 9. This lays out the other side of the flat, 8 ft deep bottom. What you should have left is 4 ft to the end of the pool., or from point 2 to 1 and 9 to 10.
Now we move to the width or the ends of the pool. Measure 4 ft from the deep end corner pins on the pool and place a pin at points A, B, C and D. Run a string line from shallow end pins to deep end pins, or from A to B and C to D.
Now you will have a 6 x 8 rectangle made by the intersection of the string lines towards the deep end of the pool. This is your deep end flat hopper pad.
5. Dig the Deep End
Replace them with bright paint to help the excavator locate the hopper bottom. Start digging out the square hopper, digging down 4 ft-8 in more (from the 42″ depth) to make it 8 ft deep at the pool bottom.
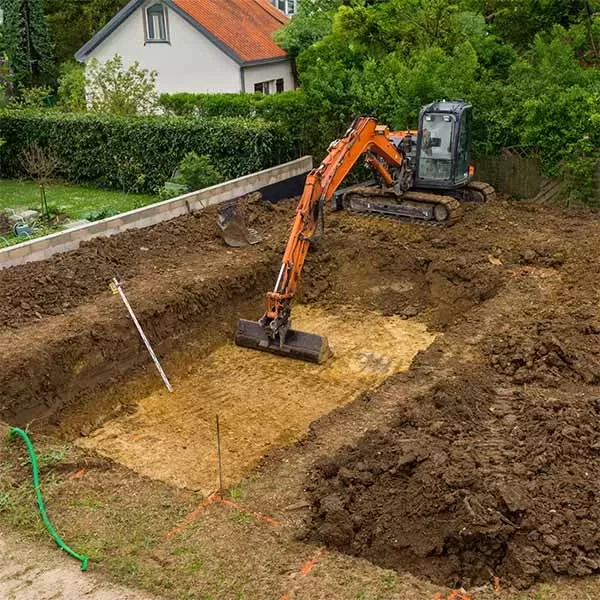
Once you reach that depth in the flat, start from the corners of the hopper bottom and dig up to the back wall of your deep end and that will be your back slope. Now go from either side of the deep up to the side walls to get your side slopes. Finally, work on the slope from points 4 and 7, to the near corners of the hopper bottom. You now have the pool rough-dug.
Usually we want to start digging from the deep end wall back towards the shallow end. Dig the hopper out first, then dig away the back wall, following the strings marking the angles from deep end wall corner to deep end hopper bottom. As you back up out of the deep end, you can shape the side walls, following the string from end of shallow floor to beginning of hopper bottom. Alternatively, you can dig the deep end angled walls from up above the pool, with the long arm of the excavator.
Replace the string lines used to locate the hopper bottom, and use a plumb bob to double check the location, and to measure the depth of your hopper bottom. At the correct depth for your pool bottom should be 2″ deeper than your finished depth This 2″ depth will be filled with your finishing floor material.
It’s likely that you’ll need some flat shovels and trowels to perfect the angles of the walls, or the joint where the deep end wall sections come together. It won’t need to be perfect, because you’ll be adding 1-2″ of floor material, but it should be pretty close to the original spec shape before beginning the floor work.
6. Shaping the Contours
Now it’s time to start shaping the pool hopper bottom and get the floor ready for the pool liner. We start by locating the finished level of the pool floor by marking a line on your pool walls, which are generally 42″ in height. Measure down the pool wall from the top to a point at 40″. With a Sharpie or Magic Marker, draw a line around the pool walls, this is the finished grade level, or the level of the floor.
Place the stakes
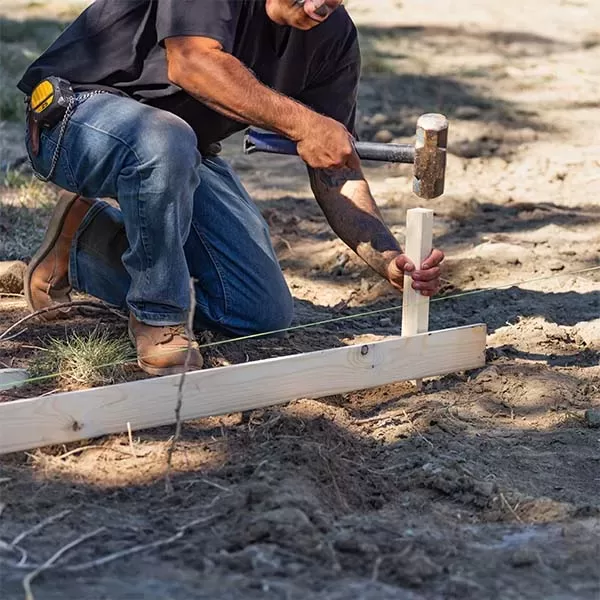
Place stakes in the four corners of the pool, right up against the wall. Run a tight sting between these four corner stakes, at the level of the mark that you have drawn on the base of the pool walls. Your stakes should be 18-24″ long, so that they don’t move with the pull of the string, or if they happen to get kicked or knocked about by the digging operation. A piece of re-bar is usually the best material to use for these stakes. With a sledge hammer or maul, pound the stakes firmly into the ground, with 3″ sticking up above ground. The string lines should line up, or be at the same level as the 40″ mark that you drew on the walls, which will represent the finished floor level.
Assuming that the pool has a shallow area slope and a deep end, let’s continue to mark out the floor shape. With your spec sheet or pool plan diagram in hand, check the length of the shallow end floor. For purposes of illustration, let’s assume a 16’x 32′ rectangle pool. For this size, our shallow end will be 8 ft long (and 16′ wide). Place two stakes on each side of the pool, exactly 8 feet from the shallow end corner stake. Run a tight string across the pool between the two stakes to indicate the end of the shallow floor and the beginning of the slope. This transition is usually referred to as the “break”.
Measure the stakes
Next, measure from the first set of stakes 14 feet, towards the deep end. Keep the measuring tape horizontal, running parallel with the 40″ mark that you drew on the walls. Don’t measure “down the slope”, but keep the measuring tape at the level of the 40″ mark. At the 14′ mark, position two more stakes – on both sides of the pool. This marks the end of the slope and the beginning of the deep end hopper bottom. Set these stakes right up against the pool wall, on both sides. Run another tight string across the width of the pool, between these two stakes.
From the point of this stake that marks the beginning of the deep end floor, measure another 6 feet towards the deep end wall, along the 40″ mark that was drawn along the base of the wall. This will indicate the end of, or the back side of, the deep end floor. Again, place two stakes – up against the wall, at this measured point, and run a tight string across the width of the pool. You should now have 4ft remaining, from this stake to the deep end corner stakes.
Measure the deep end
Now measure across the string line that runs across the back wall, or deep end, of the pool. Measure in 4 ft from each corner stake in both the deep end and the shallow end of the pool. Place 2 more stakes against the deep end walls, and run a tight string from these stakes to two shallow end stakes – also positioned 4 ft from the corner. You will now have a square across the deep end of the pool, where the strings intersect. This square indicates your 8 ft deep bottom pad. To be sure that the measurements are correct, measure diagonally across the square, to make sure the two measurements match exactly.
Next, we will precisely locate the 4 corners of the bottom pad, or deep end floor. At the point where the string cross for your bottom pad, take another stake and hold it right underneath the intersections of the strings, and pound it in place, into the four deep end corners of the pool floor. Tie a tight string between all four bottom pad stakes, 2″ above the ground, and take another set of cross measurements, to insure that the pad is square.
Run the strings
From the two stakes placed on the back side of the deep end floor pad, you will now run tight strings to the stakes located in the deep end corners. These strings will be running at an upward angle, from the deep end floor, to the deep end corner stakes, at the base of the walls. From your 2 shallow end side corner stakes on the bottom pad, run string lines up to the stakes that were placed at the end of the shallow floor, or the break. This will designate the point where the angled side walls will intersect the slope from shallow to deep.
At this point, you can remove the strings and stakes that are intersecting across the hopper bottom, at the level of the shallow end floor. Your stakes & strings should now look like this.
Now you can finish digging out the floor to these contours. The angle from the bottom of the wall to the floor should be even, and close to 45 degrees in the deep end and 30 degrees going up the slope to the shallow end floor. After the heavy equipment has removed most of the material, you can get in there with a flat shovel and smooth out the rough stuff, to help to better define the angles beneath the strings. Leave a 2″ gap between your string lines and the floor, to allow for the floor material that you will add on top of the bare earth.
What to Ask the Excavators For
Tell them that you are looking for an experienced pool digger. Their next question for you may be “What do you want done with the dirt?” Meaning, are they just going to pile it up next to the pool, or do you want them to spread the dirt or grade it, over an adjacent area, or do you also need a dump truck to haul off extra fill dirt?
You may be surprised at the amount of dirt that will come out of the hole dug for your pool, so it’s important to plan ahead. When we built my pool, I thought I had a large enough yard to sort of “absorb” the dirt into other areas, but ended up having to haul off five dump trucks full of dirt.
You’ll need about 20% of the dirt, for use backfilling the pool walls and pipe trenches. But the rest of it – could you make a small hillside, or add it to steep areas on the property? Use it for raised bed garden planters? If you can’t use it on the property, you can ask for a price to haul off extra dirt.
Free Fill Dirt
After looking at your yard the excavator can tell you if they are going to need fill removed from the site or not and if so should be able to tell you about how many loads will need to be removed. You will also need to find a place to bring it to. I asked neighbors and actually got rid of 3 loads right on my street. I found a construction site a few miles away; they couldn’t use it but told me of another site that would accept all I could bring them. Not having to drive long distances to dump the dirt saved me a lot of money.
What Type of Excavation Equipment?
An experienced pool excavation company won’t ask you which type of equipment you want them to use, they’ll know. Most pools are dug using an excavator or track hoe. Bobcat type skid steer loaders can do some early work, but their low bucket is less effective on shaping the hopper bottom floor of vinyl inground pools. A backhoe can be used, anything with an extension bucket, really. The larger the machine, the faster and easier the job will be.
Backfilling the Pool
After the pool is dug, the walls can be connected, floor work completed, pool liner installed and the pool can be filled with water. Once the plumbing is seen to be free of leaks, the pipe trenches are filled, and the space behind the pool walls is filled in. In my case, I had the same excavators return, a few days after they dug the pool, to backfill around the pool, and then I had them remove the extra dirt.
What’s it Cost to Dig a Pool?
I just had my pool built and I found a very experienced excavator at $85 per hour and it worked out to be $850 to dig the pool. That was for an 18 x 38 double roman shape pool This was a very good price as this contractor dug pools for a living, and knew that I was in the business. Generally, if you find a price for a 16 x 32 from $900 to $1,200 – that’s a pretty good price. For your pool site and size, take into consideration how much they have to do for your particular situation.
But realize that once they start digging your pool, the price could change. When unforeseen things occur like underground water or huge boulders, a flat rate price usually goes up to take care of those problems. At that point when these things arise he should be able to let you know the approximate cost to handle the problem.
By showing them your dig sheet and looking at your yard they should be able to give you an idea of the cost. Some price it out by the hourly rate, some will give you a price for the complete dig.
Payment to Excavators
In my situation the digger wanted to be paid in full at the end of the day after the dig was complete. Some may want a deposit to secure a dig date. Most will take checks or credit cards, although for my “special deal” – I had to pay in cash.
Dig your Own Pool?
You can always rent the equipment and dig it yourself – but I really would only do this if you are very familiar with digging and using the machinery. Do not rent the machine and practice on your pool, it could become very costly. What you could do, if you really want to play in the dirt – is rent a bobcat, and use it to spread the extra dirt in areas of your property, or use it to fill a dump truck if needed. These tasks, which will be needed – are less precise operations than the task of digging the pool shape to the spec sheet.
Access
You are going to need at a bare minimum, 12 ft wide open space, to get an excavator into the back yard. More than 12 would be extremely helpful, but less than that could be tight. You’ll need an equal amount of clear vertical space too, without hanging tree branches or wires in the way. The excavator will also need to move around the pool while working, and needs at least 12 ft of room on two sides of the pool to operate easily, and move the dirt around.
It’s not uncommon to have to remove a tree or two that may be in the way of the excavator accessing the site or moving around while digging, or filling a dump truck, so plan the entire route with your contractor beforehand.
Weather
One of the main things that can put a damper on your pool dig is weather, rain being the hardest to deal with, it is awful tough to dig a good pool in mud so I would check the forecast first and if you have to postpone a day or so it will be well worth it. Cold weather – where you already have frost in the ground is not very conducive to digging a pool either. It’s best to have average daily temperatures above 45 degrees, so the ground is not so hard to work with.
If all goes well, you’ll have just a small amount of hand shaping to do, to sharpen up some corners, or patch up any cave-ins, a result of soft or wet soils. Here’s some related posts that could be helpful for planning the excavation of your own inground pool kit.
Of course, you can always talk with us before and during your pool dig, if you run into something you are unsure about, or just a little apprehensive.
When you purchase your inground pool kit from In The Swim – we’re with you every step of the way, from layout to landscaping!


Come and dig us a swimming pool.