Today we continue our series of ‘explainer posts’, to remove some of the mystery surrounding pool equipment parts.
Following-up on our first post explaining Pool Pump Parts Explained, we now look at a more extensive category, pool cleaner parts.
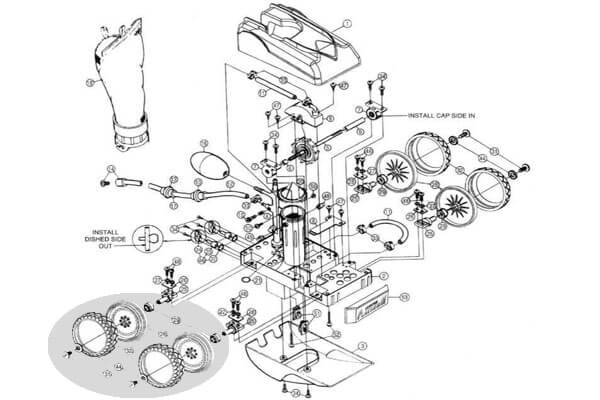
There must be thousand of parts in the pool cleaner sub-category, not just because there’s 100+ pool cleaners, but because there are three different types of pool cleaners: suction, pressure and robotic. Today we look at suction and pressure cleaner parts.
Suction Cleaners
Seal and Footpad
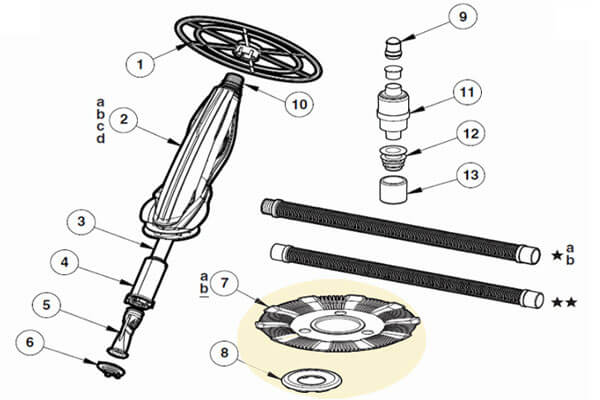
The Seal and Footpad, are in contact with the floor of the pool, and as such are subject to wear and tear, especially in rough bottomed pools. The Footpad, (#8) takes most of the wear, and serves a secondary purpose of locking the Seal (#7) in place.
Common problems besides wear and tear include sun damage or warping. When storing your cleaner, be sure the Seal remains very flat, or it can become misshapen.
Diaphragm
The Diaphragm (#1) is what creates the suction and release in Baracuda type cleaners, and is responsible for both the vacuuming suction and the movement of the cleaner, which makes a very small, almost imperceptible hop during the release. Kreepy Krauly cleaners use a Flapper for the same purpose, also called a knocker, for the loud noise it makes.
Common problems with the Diaphragm include tears or rips in the rubber material, from sharp sticks or from suction being too powerful, over a long period of time. In some cases, chemical damage can occur, although newer versions are more resistant.
Ladder Guard
The ladder guard is a large disk (#15) or ring that fits around the top of the disk style suction cleaners, to prevent the cleaner or hose from getting stuck behind pool ladders, and also functions to keep the cleaner off of steps or rubbing up against the pool walls. See also: Polaris Ladder Guard G-21, and Kreepy Ladder Guards, K12330.
Common problems with the Ladder Guard is breakage, especially when the cleaner is out of the pool, and it falls over on one side. Automatic cleaners can be fragile, one of the reasons that we sell so many pool cleaner parts!
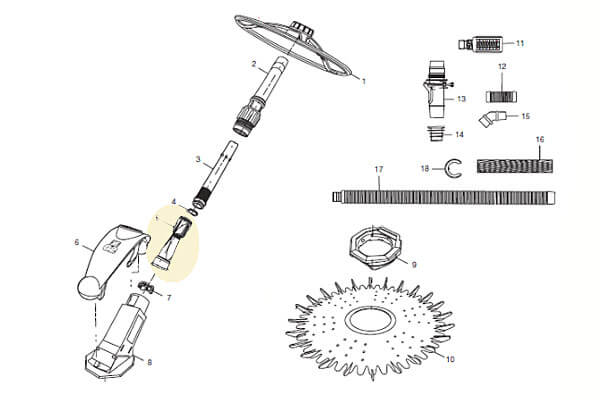
Wings & Pods
Moving onto the gear box and turbine type of pool cleaners, invented by Arneson and popularized by Hayward, these cleaners operate with a complicated set of gears driving a large turbine to sweep leaves and debris. The Wings (#27) and Pods (#31) give the cleaner balance and stability while on the surface and if it becomes ‘airborne’.
Common problems are mostly wear and tear, or by being dropped while out of the pool. Wings can become detached, and the pods can vibrate loose the screws holding them on, resulting in dragging and damage to delicate parts. Or if not replacing pod shoes…
Pod Shoes
There are several different types of Pod Shoes (#28) for Hayward Pool Vac and Navigator style pool cleaners. Pod shoes are square pads that are designed to work with different types of pool surfaces; concrete, vinyl, fiberglass. Made of Cork, Rubber, Ceramic or Santoprene, they provide traction and protect the Pods from wear and tear.
Common problems include – wear and tear, but that is what they are supposed to do, wear down slowly to protect the more expensive parts above, and to also prevent scraping and scratching of your pool surfaces. Replace them as needed, to prevent further damage!
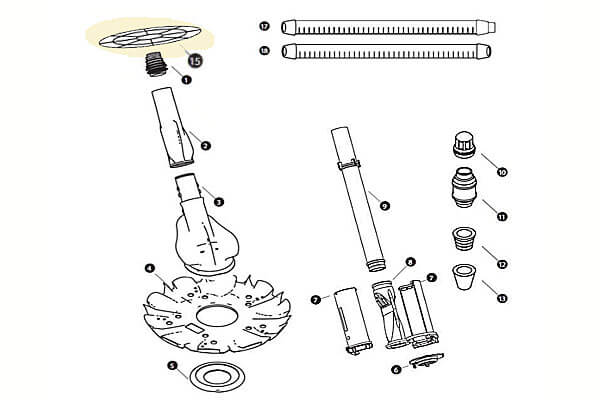
Turbine
On to yet another type of suction cleaner, invented by Poolvergnuegen and popularized by The Pool Cleaner, then copied by Hayward AquaNaut and Phoenix, and Jacuzzi Cyclone, Pentair Warrior, and others. An improved version of the gear box and turbine cleaner, the Turbine (#11) is supercharged for more power with less suction.
Common issues are few, it can be come clogged with large or long debris, but the turbine itself is durable and rarely fails.
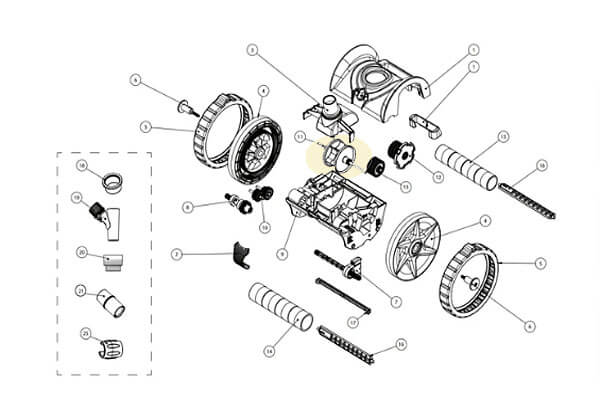
Roller Skirts
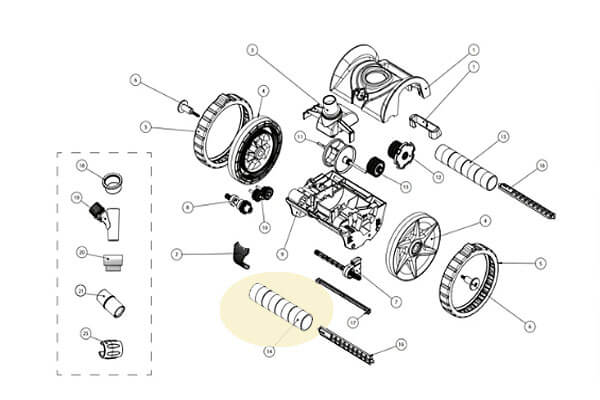
Another feature of the Poolvergnuegen style of pool cleaner, emulated by so many, is the roller skirt on front and back, which help the cleaner to maintain suction while traversing uneven surfaces, by lifting just one or two rollers at a time, and conforming to the shape of any obstacles on the floor.
Common issues are few with the rollers, the most common probably being damage from being dropped, while out of the pool, or wear and tear from very rough surfaces or from being overpowered, and literally ‘flying’ around the pool, and crash landing.
Pressure Cleaners
Sweep Hose and Tail Scrubber
Pressure cleaners typically have a Sweep Hose (#35) that functions to stir-up dust and dirt that was missed as the cleaner travels over dirt and debris. On the tip of the tail is a rough Tail Scrubber (#30), intended to brush the surface. The action of the Sweep Hose is regulated by a knob at the attachment point. A lazy back and forth speed is best.
Common problems include holes in the Sweep Hose, or the loss of the Orifice Tip (#34) on the end of the tail. Replacing the Tail Wear Rings (#36) in a timely fashion will prevent both issues. No flow out of tail at all? Go inside, the WMS hose has likely become detached. Polaris 3900 models have the Tailsweep Pro that prevents water from spraying when the tail is out of water.
Drive Belts

When the Polaris 380 was introduced, the belt-driven design was a radical departure from the earlier gear driven models 180/280. Polaris Drive Belts (#8) were originally a tan color, and tended to fray and break too easily. Quickly redesigned, today’s belts are blue, and sold as the Heavy Duty Belt Kit, 9-100-1017. Polaris 480 and 3900 models use a Drive Chain, because they’re cool like that.
Still, common problems can occur, they can break or tear, or lose some of their teeth, which causes the wheels to slip. Proper belt tension is when you can press down with your finger on the belt about 1/2″. Less deflection is too tight, and more is too loose. Adjust the wheel axle, pushing wheels (and pully) apart slightly, to tighten up loose Polaris belts.
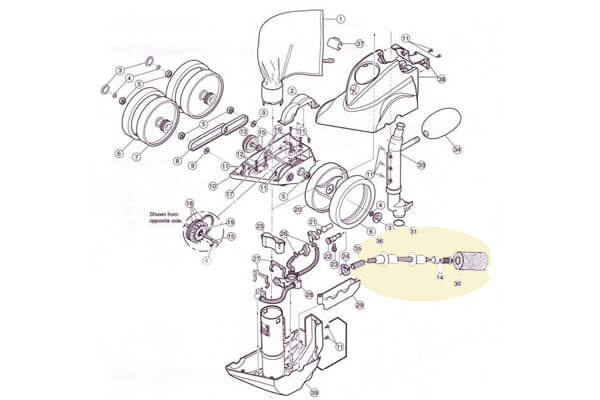
Water Management System
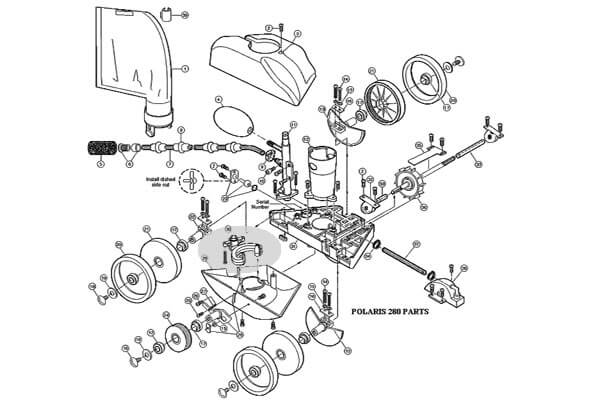
The Water Management System (#30), or WMS, is the manifold that splits the water into 4 directions, up into the venturi jets, to the Turbine (#36) to drive the wheels, and out the rear of the cleaner, through the Thrust Jet (#23), and the Sweep Tail (#7). the Polaris 280 WMS shown, is more condensed with less hoses than other models, but functions the same.
The most common problem with the WMS is clogging from small bits of sand, or plaster grit getting caught in the small orifices. Once discovered, the grit can be reamed out, or blasted back out with water pressure in the opposite direction. For those WMS with hoses attached, the zip ties can break, and the hoses can become disconnected internally.
Wheels, Tires and Bearings
Just like for your car, the wheels and tires on a pressure pool cleaner are important parts to maintain, for good tracking and traction. And like a car, Tires (#32) and Wheels (#28) can be rotated for even wear and longer life. Bearings (#29) are very important as well, to provide stability and power and the best traction for wall climbing and speed.
Common problems include loose bearings (2 per wheel), which should allow only about 1/4″ of wobble in either direction. Rounded tires will affect cleaner performance. 180/280 and Letro wheels with teeth can become stripped, and can be rotated to the rear.
Back-Up Valve
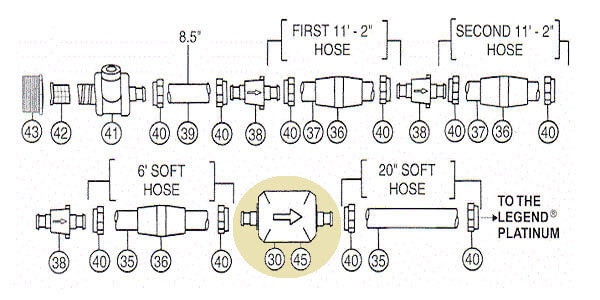
The Back-up Valve (#45) is a hydro-timer, a series of gears that are hydraulically powered, that is, the water pressure turns the gears. Ever 3 minutes, the spinning gears open up a bypass vent in the backup valve case (#30), which stops the flow of water to the cleaner and sprays the water out in the opposite direction. This has the intended purpose of pulling the cleaner off of the floor, in case it is stuck and if not, to change direction.
Common problems include damage from scraping along rough plaster/pebble floors, which can be alleviated with buoyant hose floats on either side of the cleaner reverse valve, to keep it off the floor. The valve can also become non-functional from a tiny grain of sand stuck in the gears, which can be flushed out, or located and picked out.
Hose Floats
Hose Floats (#36) are important to keep the feed hose floating on the surface. If you notice your hose dipping far into the water, or running along the floor of the pool, this can be corrected with new hose floats, or additional hose floats. Older style hose floats can become saturated with water, and then they no longer float; replace these.
Common problems are when hose floats no longer float! This leads to the feed hose coiling and wrapping around itself. This may damage the backup valve or to the hose swivels. Leakage around hose swivels is normal, but if water is pouring out – reducing the cleaner speed, replace these.


RE:Hayward 200 chlorine feed unit..
Drain plug nut shorn off. How do I remove it without damaging the threads?..does chlorine deteriorate the plug? Replace every few years?
Chris, if you use a sharp phillips head, you can tap it into the plastic to get some bite, then turn to remove the plug. You may need to cut the + grooves with a razor knife, if tapping the screwdriver with a hammer does not work. Chlorine would not deteriorate the plug, something must have hit it, or maybe an animal gnawed it off.
Dave,
I have a different problem, at opening water was greenish brown. I got it all cleaned up but now I have a yellow tint on walls and on floor of the vinyl all over 18 x 33 pool. I balance the water put shock in it, up the chlorine, brushed, vacuumed and still can’t get rid of the yellowish stain on the walls and floor. I have put 6 lbs. off yellow out into let it circulate for days, weeks. nothing is getting the stains off the walls and floor. about ready for the backhoe. Help me please.
Hi Donna, if it is a stain and won’t brush off, and yellow out did nothing, it’s likely not yellow algae. Have you tried any stain removers? If you have any vitamin C tablets, you could crush up a dozen or so, into a powder, and test apply over an area. If it works, search for Ascorbic Acid on our site, we have 3 options. If that doesn’t work, you could try our other Stain Remover, EZ Stain Remover, which is a stronger acid. https://www.intheswim.com/c/stain-chemicals
Hello, I think this is great that you tell people about the parts of a pool. I think it’s also amazing that you tell people how to improve the quality of the equipment to make the pool the best it can be.
Hello, I think this is a great idea to add the parts of a pool and how they work. Thank you for adding ways to improve your pool quality as well.
My Hayward pump from 2008 needs replaced. I believe it is 1.5 HP. I have a 24 ft round above ground pool with 15000 gallons of water. I have been reading g about dual and variable speed pumps that are energy efficient and save money on electricity. I have also read reviews on them that say they are a waste of money because they break and don’t last long. Can you guide me in a direction to what I should get? I’d like to save money on electricity but don’t want to buy an expensive pump that won’t last long.
Hi Deborah, VS pumps are awesome, they run quieter, cooler and last longer than traditional pumps and cost 50-75% less to operate. To get the most savings, reducing restrictions in plumbing is important, like using sweep elbows, and cartridge filters without backwash valves, or for sand/DE using a Slide valve instead of multiports, and using 2″ plumbing instead of 1.5″. But even without doing anythng other than replacing the pump, you should see at least 50% savings. Another method to save is to run the pump at the lowest speed for the majority of the day, and night. Most people run 20 hours on low-speed and then 4 hours on high speed for deep cleaning and skimming and sanitizing, heating, etc… That’s the equivalent of running just 7-8 hrs per day, but the water is being filtered constantly 24/7 and never sits stagnant.
I am installing enersol solar panels. I have a frogger (chlorinator) after the filter. When installing do I need to move frogger so that the water goes through the panels then through the frogger to the pool.
Hi Melissa, good choice, I really like Enersol panels. Typically you want all of your sanitizing and purifying stuff to be ‘last on the line’, after any other equipment, so yes I think I would move it. Be sure to install with a 3-way valve and check valves, and for the best results, I highly recommend a solar controller. If you don’t have one yet, look at our Goldline controller. Includes 3-way valve and actuator and sensors and control/thermostat. It will turn on solar automatically, only when conditions are right, and shut it off when heat transfer turns negative (it can cool the pool to use the solar system when it’s raining or at night, or on cool, overcast days),