Plaster pools are the most common type of inground pool in the USA. There comes a point when the plaster starts to get old and pitted. This is due to age and the years of chemicals eating away the finish. Many times plaster degradation is due to improper water balance. Some problems with a plaster finish can be caused by the mix or the application of the plaster. In any case, plaster is a natural product, and is meant to degrade. Hard enough to be durable, but soft enough to remove a thin top layer by acid washing.
So, when do you need to re-plaster? Many folks re-plaster the pool during renovation, about every 20 years or so. Some do it more often to keep a nicer finish, or to change colors. Don’t let your pool guy tell you that you must replaster or your pool will fail. Bare spots and cracks are a concern and should be fixed. But the usual decision force is from an aesthetic viewpoint. Sooner or later, your plaster will be dull, stained and not too pretty. When you get tired of it – you’ll know it’s time to replaster.
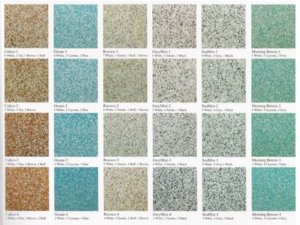
There are many types of plaster finishes on the market these days. Now you have many choices in color and the look of the finish. Most are marble or quartz based but there are a few now that have pea gravel or a synthetic additive.
White plaster is still the most common color. Blacks and Greys are losing favor, but were very popular 10 years ago. No matter what color finish you choose the prep and the application are about the same. I will cover the prep instructions below.
Draining the pool:
You must drain the pool to apply plaster. In this day in age you might want to check with your county or state on the laws about discharging pool water in to a sewer or stream. It is best to remove all the chlorine before doing so. There is a product called “Chem Out“ that will do this for you. Think before you put chlorine into a stream it will kill the algae, causing a ripple effect on the whole eco system.
Also important whenever draining a pool is opening the hydrostatic relief valves. These are commonly spaced throughout the floor of the pool, in both shallow and deep end. These white caps are plastered over and need to be chipped out and exposed, before they can be unscrewed and removed. Excess table water beneath the pool, or water that you are pumping out of the pool, can put so much pressure (hydrostatic pressure), under the pool shell that it can actually lift the pool out of the ground! Pop! As a pool is draining, the hydrostatic plugs are removed – very important – to allow the excess water beneath the pool to flow into the pool.
Cut and chip:
This is the prep part of the job. If you have a tile band around the top of the pool you will have to get a diamond blade grinder. You will want to do a ¾ inch cut right under the bottom of the tile band. Next you need an air chisel (a hammer and a masonry chisel will work but will make you tired fast). Start an inch and a half below your cut and chip at an upward angle. Professionals will set up scaffolding in the deep end to keep proper position.
The goal is to remove a chip under the tile, that space where the chip is if how the plaster goes up to the tile without creating a budge. It will leave a nice smooth transition from the plaster to the tile. Next you will want to chip around the return and drain fittings in the pool, and also any underwater light niches. Be sure to follow proper safety measures. Wear gloves and goggles and a facemask. Make sure pool is drained fully in case you drop your tools in the water. This is rather dangerous work, so be sure to hire a qualified contractor.
Acid washing the pool.
This is not your regular acid rinse of 60/40 (60% water 40% acid) – this is where you pour straight muriatic acid over the whole pool , from the tile down the walls, and all of the floor – and let it sit there for several minutes to etch the old plaster. This will eat off the old plaster and rough it up so the new plaster has something to adhere to and grab hold of. This is a hazardous job and you need a respirator, gloves and eye protection. You will also need to neutralize the acid before you can dispose of it. To read more on acid washing pools
Plastering the pool:
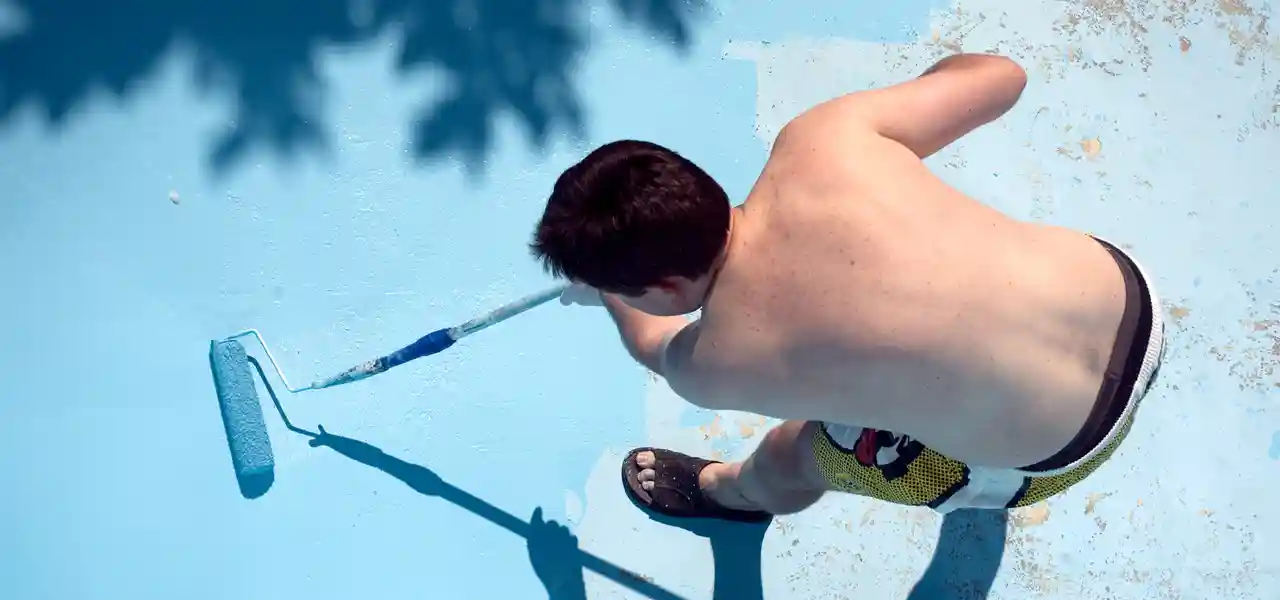
No matter what type of plaster you use they are mixed in a similar manner. At the street or in the driveway, there will be a large concrete pump truck “Plaster Rig” that mixes the white portland cement and marble dust and pumps it to the pool. At the pool the plasterers begin to shoot the mix on the pool walls and floor. They walk around with special stilts / peg shoes so they only leave 4 little holes that can be troweled out before they are done. The process is a lot like icing a cake. They use a long trowel stroke to smooth out the finish.
The entire plastering job takes 2-4 hours. It must be done fast, because we want to get the fresh plaster underwater within the shortest amount of time. Best time to plaster would be early cool mornings, or late afternoons. The hose is set on the main drain cover to fill the pool, wrapped with a sock to diffuse the water. The fill must not stop until full, or a water mark can occur. If not full soon enough, +/- 24 hours, depending on daily temperatures, stress cracks will be noticable on steps and upper wall sections, from the plaster drying out to fast.
Plastering is both an art and science that I would not recommend doing yourself. To find a qualified company, I would recommend a member of this trade organization http://www.npconline.org/
Plaster care:
Plaster pool finishes cure under water over the first year after it is plastered. The pH will tend to rise rapidly, and you will need to have a lot of pH reducer chemical to keep your pH level in the 7.2-7.4 range. During the first month, it is important to test the water daily and give the pool a hard brushing every day too. The pool will immediately begin to produce plaster dust, and daily brushing twice per day is recommended to remove these scaling materials to the filter, where they can be backwashed out. This plaster dust can choke streams and cause other damage to plants and wildlife, so please dispose of properly. Maintain and adjust Calcium Hardness and Total Alkalinity levels within the first few days of starting up the pump/filter. Begin chlorinating slowly.
An “Acid Start” is a procedure that eliminates the plaster dust, and hence much of the brushing. It must be done very carefully however to be effective.The idea is to drop the Total Alkalinity level to zero, and then rebuild it with the carbonates that are contained in the plaster dust.
Here’s how I do an Acid Start-up. As the pool is filling, immediately after plastering, add 1 gallon of muriatic acid directly to the water (don’t splash it on the bare plaster) per 5,000 gallons of fill water. Wait to add the first gallon after the bowl is nearly full. With a watch, time the amount of time it takes to fill up a 1 gallon or 5 gallon bucket with the hose(s) used to fill up the pool. Do the math to determine how many gallons are added every hour. Divide 5,000 by the number of gallons coming out of your hose(s) per hour, and you will know how long it takes to fill 5,000 gallons from the hoses.
When the pool is full, test the Total Alkalinity. It should be zero. Then test the pH, and do a base demand test to determine how much pH increaser to add. Add up to 6 lbs of pH increaser at a time, brushing the pool to distribute fully. Wait several hours in between 6 lb additions. When all of the pH increaser is added, recheck pH and Total Alkalinity. Add additional increasers if needed and keep brushing.