It happens all the time, where I’m talking to someone about a filter problem they’re having – when it’s actually a valve problem. DE and Sand filters use either a Multiport valve (MPV) or a Push-Pull (slide) valve to backwash, or send the water backwards through the filter media, flushing out the dirt.
These types of multi-directional valves are very convenient, but they do require maintenance. Slide valves are much less complicated, and hence more reliable than MP valves, which have many more parts, especially in the key assembly, which is the part that lifts out when you remove all of the bolts around the lid.
When Should the Valve be Replaced?
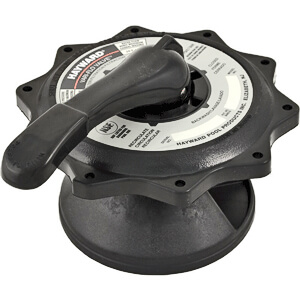
The question is valid, because you could, in most cases, replace a few valve parts and restore your valve to like new condition. It may need a very small part or gasket, or a whole new key assembly (shown above), which is a plumbing free repair and usually easier than a valve replacement. Nonetheless, there are times when it makes sense to replace the whole valve.
- Cracked Valve body
- Cracked Union nuts
- Whole is cheaper than the Parts
Replacing a Push Pull Valve
A Slide valve attaches to a sand or DE filter through two bulkheads, but they aren’t the same valve. A DE slide valve will enter the tank through the bottom bulkhead and backwash out of the top – for a sand filter slide valve, it’s just the opposite. So, they’re not interchangeable, and neither are valves of different manufacturers.
The bulkhead spacing and the thread size are different on valves from different manufacturers, so make sure that you have selected your new valve by type, manufacturer and port size.
The Hayward slide valve plumbing design is shown left, with the plunger handle in the up or backwash position. Other manufacturers have the waste port coming out of the bottom of the valve body, but again if you replace with the same valve, you should have no problems.
To replace a push pull valve, on a sand or DE filter, first drain the filter tank. Find a suitable place to cut the two pipes that glue into the valve, on a spot of PVC that gives you 2″ on either side of your cut, to reattach the pipes with a glued coupling. Use a hacksaw to cut straight through the pipes, then you can loosen the large bulkhead nuts to remove the old valve. Screw on the new valve, and reattach the two pipes with a SxS coupling with some PVC primer and glue.
Replacing a Multiport Valve
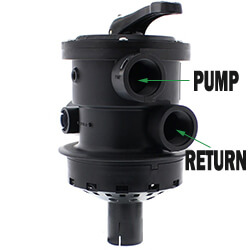
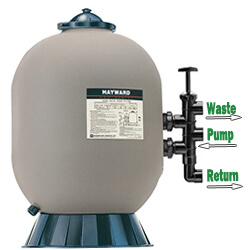
A sand filter can have either a side mount multiport valve, or the more common top mount valve, shown here. The top mount valve attaches to the standpipe through the bottom sleeve, and above the diffuser, a flange mates the valve to the filter tank, held in place by a steel clamp band. Side mount multiport valves, for sand or DE filters connect to the tank via two bulkhead flanges. Multiport valves, like slide valves always have 3 connection ports – incoming water (labeled PUMP), returning water (labeled RETURN), and the backwash port (labeled WASTE) on the opposite side.
Different filter tanks will use different valves, make sure that your replacement multiport valve is the same type, make and model. The standard Vari-Flow valve is used on many filters, not just Hayward. Pentair and Praher also make mighty fine multiport valves, but they are all different and not interchangeable. Call us if you need help identifying your replacement multiport valve.
Replacing a Top mount multiport is a little different from the slide valve, but not much. After cutting the two pipes connected to the valve, leaving room to connect a coupling, or unions, you can loosen the clamp or remove the bolts that secure the valve to the filter tank flange. Now you can pull upwards with a slight twisting motion to pull the valve up and off of the standpipe.
With the valve removed, you can unthread the two pipes from the valve. Use large channel pliers or strap wrench to twist out the 1.5″ or 2″ fitting and short pipe out of the valve (counter-clockwise). Once removed, clean up the threads if needed, and wrap them with 3-4 wraps of Teflon tape, in a clockwise direction, and thread these short pipes into the new valve, into the same ports they were removed from, Pump or Return.
Be careful not to overtighten the pipes! Follow label instructions, which usually says to tighten no more than 1-1/4 turns past hand tight. Overtightening can split the valve body, with a small crack running through the threads. For the clamp band however, the tighter the better, and don’t forget the large o-ring that goes under the flange!