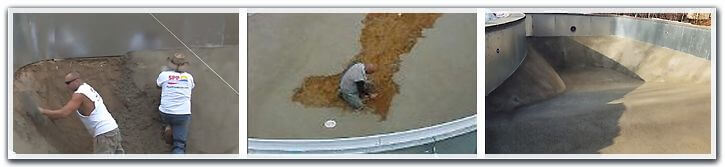
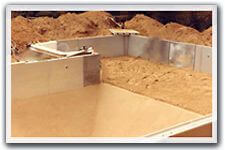
After the pool is dug, and the walls have been erected, work on the pool floor can begin. The first step is using flat shovels to hand shape the pool floor in areas that are a little high. String lines and measuring tapes are used to locate the corners of the hopper, and to make sure the wall and floor sections are symmetrical, or the same length, width and depth.
When it comes to installing your pool floor, there are some choices in materials that can be used. Sand, Sand/Cement Mix or Vermiculite/Cement mix. This material is placed over top of the raw earth, to a thickness of about 2 inches, and shaped with trowels into a flat and smooth base for your pool liner.
Pool Floor Materials List:
To install a pool floor for a vinyl liner pool, inground or above ground, here’s the items you’ll want to have:
- 2 – rounded end trowels
- 2 – wood float trowels
- 4 – strong workers
- 4 – 5-gal buckets
- rotary mortar mixer
- water for mixing
- wheelbarrow
- shovel
Sand Floors
We do not normally recommend a sand base for our inground pool kits, for a few reasons. One, sand can develop heel marks or be “dented”, and Two, it can wash out or liquefy with a high water table. However, sand does have some advantages.
First, it’s definitely the cheapest pool floor material available. For a few hundred dollars you can have enough sand delivered to do the floor. Secondly, it’s the easiest to use, and third, it’s the most readily available.
For these reasons, sand may be a good choice. However – you also should have a pool location that is not affected by a high water table, and have soils and location that are well drained. If you choose sand, use Masonry sand, screened and washed, without small pebbles. A sand floor will need to be re-troweled whenever the liner is replaced in the future.
Once the sand floor is troweled smooth, exit the pool and immediately install the pool liner, before debris blows in, or rains come your way.
Sand/Cement Floors
The ratio here is 4 parts masonry sand, 1 part Portland cement, Type I or II. Mix it with water in a rotary mixer, and deliver the mixed material in 5 gallon buckets, handed into the pool. This type of pool floor is about twice as expensive as a sand floor – with the cement expense and the mixer rental, but produces a hard bottom that resists dents, roots and erosion.
Just like with any pool floor installation, use two round end trowels to smooth out the sand/cement mix to the proper height, and define the lines between the deep end walls and hopper bottom, the side slopes and center slope, and shallow end to center slope. Use the edge of the trowel to shave off high spots and built up low spots.
Strings running across the deep end will help you locate the hopper bottom corners, and strings at floor level help to keep the transitions straight and sharp.
After installation, give the mixture 24-48 hours to cure, and then install the liner. Because of this delay, be sure to check the weather before your floor installation, to be sure that no rain is predicted for at least 24 hours. Also, before installing the liner, use a vacuum and/or blower to clean any debris from the pool floor, and inspect for any rough spots.
Vermiculite / Cement Floors
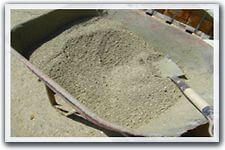
The ratio here is 2 bags of fine grade Vermiculite to 1 bag of Portland cement, Type I or II. Mix it up in a rotary mortar mixer with water, until you get a wet oatmeal consistency, and then pour it into wheelbarrows which can be wheeled into the pool on a long 2×12″ board, or hand it into the pool in 5 gallon buckets.
The advantage of Vermiculite over sand is that it produces a more flexible pool floor, which isn’t quite as hard as a sand/cement floor, even has a soft, bouncy feel. It’s also has a much lighter weight, and is easier to move, mix and trowel into place than a sand/cement mix. The insulative properties are greater than sand/cement, and may help to reduce ground heat loss. It absorbs moisture, and is more prone to algae and mildew growth than sand/cement floors. It can also be the most expensive type of pool floor.
Use a wood float to spread a vermiculite pool floor and a trowel to fine tune any edges. Use even pressure to avoid trowel marks. Pool Base is a pre-mix form of vermiculte/cement that may be available from local pool distributors or pool builders. For our SPP inground pool kit customers, we can quote a price for pool base or fine vermiculite delivery.
After installation of a Vermiculite pool floor, the liner can be installed with delay, and it’s advised to install the liner immediately after, to keep it clean and dry.
Pool Floor Installation Tips
- Have more material on-hand than you think you need

- Have more helpers on-hand than you think you need
- Mix consistently, the same amount of water – wet, but not too wet
- Mix only what can be applied to the floor in about 20-30 minutes
- Do the side angled walls first, hopper, slope, and then the shallow floor
- 1″ or 3″? Thicker pool floors have less chance of problems from roots, rocks or water
- Overdig the pool sufficiently, so your finished pool depth is correct with floor installed
Once the process begins, most pool floors can be installed in 3-4 hours. It’s hard work, make sure you have some help. I would recommend two people in-the-pool troweling, and two people up-top, mixing and moving the material.
~ We have hundreds more blog posts like this, to help you every step of the way to install your own inground pool. We also provide our clients with unlimited support in planning and constructing a self-installed pool, free of charge!