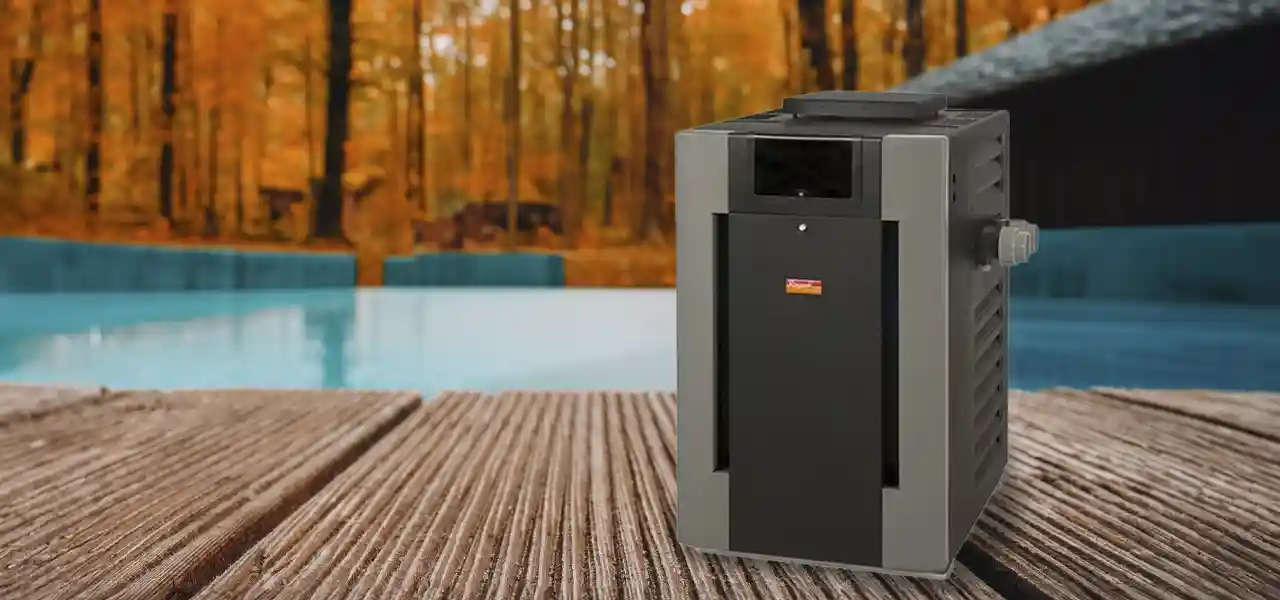
Gas pool heaters are one of the best additions to a pool, but they are the most high-maintenance piece of equipment on the pad. A millivolt pool heater has a standing pilot, burning all the time. It usually has just an on/off switch and a thermostat dial, not a digital display panel.
Troubleshooting Guide
A millivolt pool heater gets its name from the 500-600 millivolts created by a thermocouple, called the pilot generator. The generator is positioned so that the flame of the pilot light (burning all the time), heats up the metals inside, until a small electrical charge is created. It’s not even 1 volt, its 0.60 volts, or 600 mv – but it’s enough to run the safety circuitry in the heater.
The diagram below is from the Teledyne Laars Series One heater, Model EPG/EPM, but also is suitable for Series II ESG, and older Mark V DM/DR heaters and XE-EG heaters.
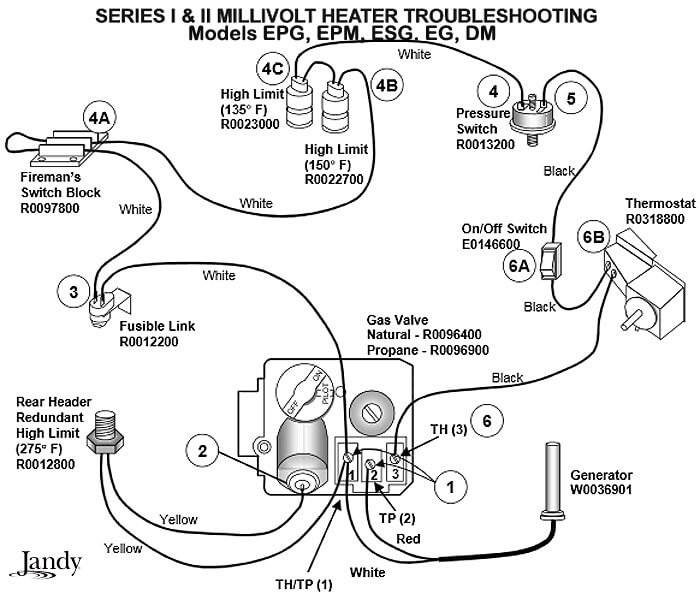
What we have here is a schematic diagram of the safety circuit in a millivolt pool heater. The pilot generator creates the millivolts, and the power does a circuit, or a loop, from one side of the gas valve to the other.
When the power successfully passes through all of the components (pressure switch, high limits, fusible link) and again returns to the gas valve coil (2), the valve should open and allow gas to flow into the burners, which are ignited by the still burning pilot.
Let’s take it step by step….
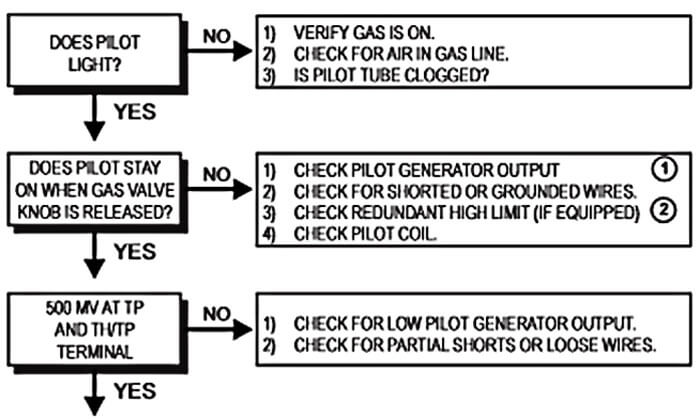
Step 1: Pilot Check
Does the pilot light?
If your pilot light is not burning, check that gas flow is on at the meter and at the heater. If you smell gas, proceed cautiously, and spray the pilot tubing with soapy water to rule out leaks at the connections or corroded pilot tubing.
Another cause of the pilot not lighting is (2) air in the gas line. If a new pilot was installed, or this is the first use of the heater in awhile, you may need to bleed the air out of the line. Repeat the pilot lighting instructions on the heater door.
For (3), the pilot tube itself rarely becomes clogged but the pilot orifice does, with bits of rust or infestations of tiny spiders. To check this, carefully remove the pilot tube brass ferrule nut, using a flare nut wrench, one that wraps the soft metal tightly. When removed, blow into the tube forcefully, or use a bicycle pump or a small amount of compressed air.
Does the pilot stay on when the knob releases?
When the millivolt power from the generator reaches the gas valve, releasing the pilot button will allow the gas to continue flowing to the pilot, if the power is sufficient. If you have a strong burning pilot, be sure that the flame is engulfing the pilot generator; sometimes they can slip down, away from the flame.
Next, check the wires from the pilot generator, be sure they are tightly attached to the TH/TP and TP terminals 1 and 2, and there is no corrosion or rust present. Also check the yellow wire that runs to the coil, (2) in the diagram above, to make sure it is making a tight connection to the pin. If your heater has the redundant high limit switch (heavy brass sensor with yellow wires), use a jumper wire to bypass the switch, to be sure it’s not causing the problem.
Finally, if the pilot still won’t stay lit, it’s time to check the millivolt output. Get out your multi-meter, or electric meter, and set it to MV, in a range that will read between 500-1000 mv. Place the leads of your meter on terminals 1 and 2 or TH/TP and TP. After lighting the pilot, wedge a thick flathead screwdriver between the knob to hold it down, or recruit a helper to hold it down. Keep holding down the button for up to a minute, or until you can verify the output of at least 500 mv (600+ is even better). If you don’t have at least 500 mv, and there are no shorts or bad connections noticed, replace the pilot generator, or the entire pilot assembly.
Step 2: Safety Circuitry Check
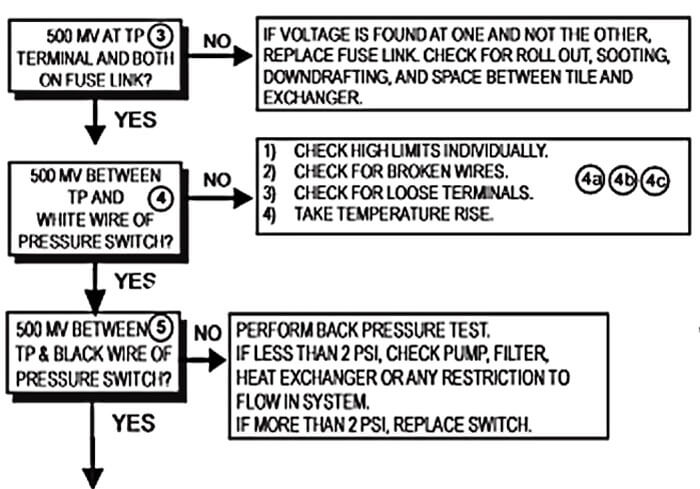
500 MV at terminal and fusible link?
If your pilot is now burning, but your millivolt pool heater won’t fire, we want to check that the milli-voltage is flowing properly through all the components of the safety circuit. Using the same multimeter, with one meter clip on the TP terminal use the other clip or probe to check both connections on the fusible link. If you have voltage in, but no voltage out, the fusible link is bad. The fusible link has a small wax pellet inside that when melted, opens the switch. Why does the pellet melt? That could be an important question, so investigate for flame roll-out (flames coming out the front), which can be caused by material laying on the burner tray, or loss of internal firebrick or insulation, or the heat exchanger could be sooted or filled with leaves, preventing proper exhaust. If none is found, replace the fusible link, and carry on.
500 MV between TP and pressure switch?
The pressure switch shuts off the millivolt pool heater if the water flow is low. Most common cause of this is a dirty pool filter or pump basket, or clogged pump impeller. If you don’t find 500 MV between TP and the white wire (the wire coming to the pressure switch), then move your meter to the wire ends of the high limits, sticking the probe into the wire nuts, or using a jumper wire to bypass each high limit switch.
A Temperature Rise test is done with a special thermometer that is inserted into the drain plug hole on the front header, and can determine if the Internal Automatic Bypass is faulty, allowing too much water to bypass the heat exchanger. You can inspect the internal bypass manually by removing the two bolts on the side cover plate. You should find the rod, spring and diverter intact – if not, I know where you can get some replacement parts fast!
When you move to the black wire of the pressure switch, you are now verifying that the pressure switch itself is not keeping the heater from turning on. If you have 500 mv coming in but 0 mv coming out – it’s not necessarily a bad pressure switch. Again, verify that flow is proper – clean filter, impeller and baskets. Check the internal bypass assembly for damage or missing parts.
Finally, the pressure switch may be out of adjustment or not properly calibrated for altitude or height above the pool water level. Many pressure switches are adjustable by making small turns to the adjustment screw or knob, to change the pressure at which the switch closes. And in some cases, it’s just a bad pressure switch, but not usually.
Step 3: Gas Valve Check
If your millivolt pool heater has a strong pilot, and you have verified 500 mv at all of the safety switches (pressure switch, high limits and fusible link), then it’s time to look at the other components. What’s left? Just the Thermostat, the On/Off switch and the Gas Valve itself.
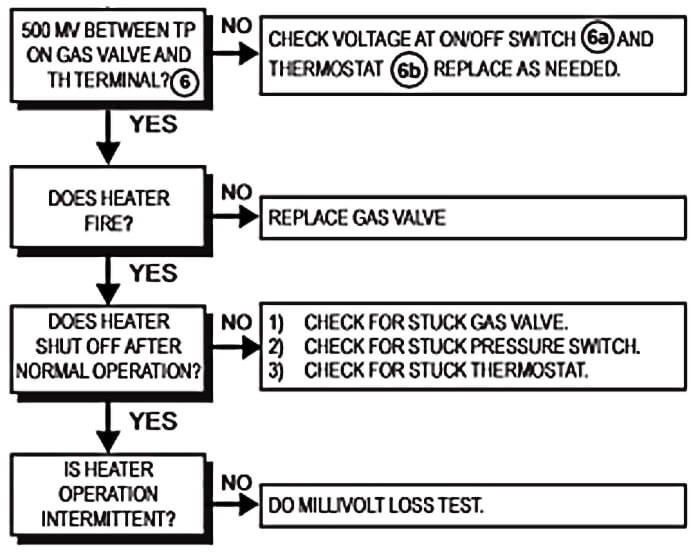
500 MV between TP and TH terminals?
When you place your meter leads on both the TP and TH terminals, you are checking through the entire system or circuit, including the Thermostat and On/Off switch. If you don’t get 500 mv, remove the screws that hold the rectangular thermostat plate and get your leads right on the terminals of the thermostat, one on each side. Do the same for the on/off switch. (Remember, the problem lies where the power dies). You can also use a jumper wire with a steady hand, or one with alligator clips, to ‘jump-out’ each of these components individually. These are both very mechanical devices, not a lot that can go wrong with them, but they do fail, eventually.
Does the heater fire?
If you have verified all of these things above, and the millivolt pool heater still won’t fire, try giving the gas valve a tap with a small hammer (sometimes they get stuck closed). If the gas valve still won’t open, releasing gas to the burners, you may want to check that the screen inside is not clogged (where the gas pipe screws into the valve), although this is rare. Also rare is clogged burner orifices, from small insects or debris; this is easy to check by reaming out the first few burner orifices. with a small bent wire.
Be careful working around gas pool heaters as they can be deadly dangerous! Do not bypass safety circuits to operate the heater, or you could be creating a very costly future repair.
And if you need pool heater parts, well that’s kind of our specialty around here. If you found this article helpful, please help support the blog by making a small purchase in our Pool Heater Parts department!