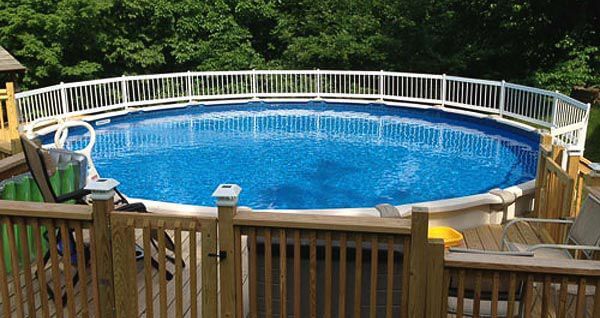
In most parts of the US, aboveground pools are required to have locking safety ladders and top rail fencing to prevent unsafe access to the pool. Locking ladders are fairly simple to install (once assembled), but installing fence panels on the top rail of an aboveground pool can take nearly a full day, and a plan of attack.
Buying Aboveground Pool Fence
Buying something is usually the easiest part of any installation, but in the case of above ground pool fence, you want to make sure to buy the correct fence height, and the correct number of panels.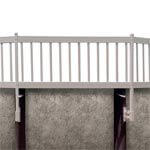
- Aboveground pool fence comes in two heights, 24″ and 36″. If your pool is fully above the ground, the 24″ height is usually tall enough to meet local codes. If your pool is partially buried however, you may need the 36″ pool fence, to meet local height requirements.
- How many fence panels do you need? Count the number of uprights on the outside of your pool; the posts in between the wall panels. Each fence section is 64.5″ wide, and is cut to fit shorter distances between uprights, and to fit snugly up against ladders or steps.
We offer two grades of pool fencing for aboveground pools – standard and premium. Standard comes in 24″ height only, in white color, with round pickets. The Premium comes in both 24″ or 36″ heights, in white or taupe color, with 1-3/8″ oval pickets with internal ribs for strength.
Our aboveground pool fencing is made with 100% resin plastic, for years of performance and good looks, with zero maintenance or problems. A better choice than wood, aluminum or steel fencing! Plus, it comes with a 5-year warranty from Vinyl Works Canada!
Getting Ready to Install Pool Fencing
The first two steps for installing an aboveground pool fence are as follows:
- Locate your skimmer, inspect all uprights, and anything else that may be attached to the side of your pool to ensure that it will not interfere with the pool fence installation.
- Obtain all the necessary tools, such as: Cordless or power drill with a Phillips head screwdriver, hand saw (fine tooth), tape measure, and safety glasses.
Always be careful with these tools and pool fence hardware around your pool. These items are sharp and can cause damage to your vinyl liner. Also, if using power tools, take all necessary precautions when working in close proximity to water (or use cordless).
Installing Aboveground Pool Fence
![]() MOUNT POST BRACKETS TO VERTICAL UPRIGHTS: Place the post bracket just beneath the top rail, in the center of the upright post, and mark the screw holes with a pencil or pen. Pre-drill screw holes with a 5/32″ metal drill bit. Fasten the post bracket to the upright using the supplied screws. Take careful measurements, and repeat the process on all of the uprights around the pool. Insert the bracket post supports into the bracket and then insert the post into the supports, with the screw holes facing outwards. Check that the holes for the horizontal rails are no more than 2″ above the pool top rail; if so, the posts can be shortened to reduce the gap between the top rail of the pool and the bottom rail of the fence. Tighten down the posts with the bolts provided and repeat the process, all the way around the pool, being careful to measure correctly, so all posts are the same height and distance from the pool top rail.
MOUNT POST BRACKETS TO VERTICAL UPRIGHTS: Place the post bracket just beneath the top rail, in the center of the upright post, and mark the screw holes with a pencil or pen. Pre-drill screw holes with a 5/32″ metal drill bit. Fasten the post bracket to the upright using the supplied screws. Take careful measurements, and repeat the process on all of the uprights around the pool. Insert the bracket post supports into the bracket and then insert the post into the supports, with the screw holes facing outwards. Check that the holes for the horizontal rails are no more than 2″ above the pool top rail; if so, the posts can be shortened to reduce the gap between the top rail of the pool and the bottom rail of the fence. Tighten down the posts with the bolts provided and repeat the process, all the way around the pool, being careful to measure correctly, so all posts are the same height and distance from the pool top rail.
![]() ASSEMBLE POOL FENCE SECTIONS: Above ground pool fences have a top and bottom rail, with vertical pickets. Step two begins with measuring the distance between the vertical posts, top and bottom, and cutting the PVC resin rails to a length of 1-1/4″ longer. Cut both rails at the same time, so that the picket holes in top and bottom rails line up vertically. Insert the bottom rail into the holes on each post, to fit into each post to a depth of 5/8″ – 3/4″. Next, insert the vertical pickets or rods into the holes in the bottom rail. Then insert the top rail into one post, and insert the rods into the top rail, and push the other end of the top rail into the opposite post. Measure, cut and assemble each section separately, to account for small variations in the distance between vertical posts.
ASSEMBLE POOL FENCE SECTIONS: Above ground pool fences have a top and bottom rail, with vertical pickets. Step two begins with measuring the distance between the vertical posts, top and bottom, and cutting the PVC resin rails to a length of 1-1/4″ longer. Cut both rails at the same time, so that the picket holes in top and bottom rails line up vertically. Insert the bottom rail into the holes on each post, to fit into each post to a depth of 5/8″ – 3/4″. Next, insert the vertical pickets or rods into the holes in the bottom rail. Then insert the top rail into one post, and insert the rods into the top rail, and push the other end of the top rail into the opposite post. Measure, cut and assemble each section separately, to account for small variations in the distance between vertical posts.
![]() TIGHTEN UP FENCE SECTIONS: With the entire fence assembled, but not yet tightened, you can make any small adjustments needed to ensure that the vertical fence pickets are indeed vertical and not slanted, and that the fence is not leaning toward or away from the pool. To adjust the vertical orientation of the pickets, just move the top rail slightly, and once in position, use the supplied screws to tighten securely the post and the rails together. For additional strength, and to keep the fence rails from pulling out of the posts, use two screws on the inside of the post, against the inside wall of the post. If any fence sections appear to lean out (away from the pool) or in towards the pool, adjust the post support and tighten the bracket screws. Once all screws are tight, install the post caps, and double check that all sections are strong and secure.
TIGHTEN UP FENCE SECTIONS: With the entire fence assembled, but not yet tightened, you can make any small adjustments needed to ensure that the vertical fence pickets are indeed vertical and not slanted, and that the fence is not leaning toward or away from the pool. To adjust the vertical orientation of the pickets, just move the top rail slightly, and once in position, use the supplied screws to tighten securely the post and the rails together. For additional strength, and to keep the fence rails from pulling out of the posts, use two screws on the inside of the post, against the inside wall of the post. If any fence sections appear to lean out (away from the pool) or in towards the pool, adjust the post support and tighten the bracket screws. Once all screws are tight, install the post caps, and double check that all sections are strong and secure.
And that’s about all there is to it! If you want more detail, see the complete Vinyl Works Resin Aboveground Pool Fence System Installation Manual. One person can do it, or two people makes it go almost twice as fast. For a 24′ aboveground pool fence, installation should take about 4 hours to complete. Start early, when the weather is cool, and it won’t seem so long! Take a look at our standard and premium pool fence for above ground pools, it’s DIY friendly!