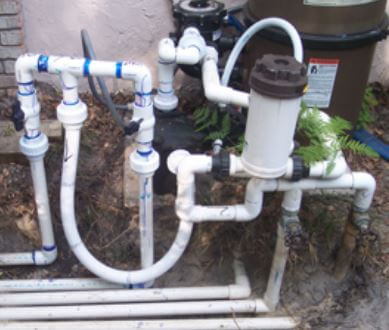
How do you like the plumbing job shown here? It’s the worst bit of pool plumbing I’ve ever seen! And to top it off – this was the finished pool pipe renovation!
This shade tree plumber has made a real mess of the pool plumbing, with unnecessary turns and twists, fittings and unions. And, what bothers me the most, is that he left the old brass ball valves on the return lines. Ugh.
The better route, especially since he already dug up all the pipes, is to ‘cut it off at the knees’, as we used to say. Starting from scratch is sometimes best. It also allows you to reposition the equipment for better service access or air flow, or to line things up better, to use fewer elbows.
Here’s how I would have replumbed this pool system…
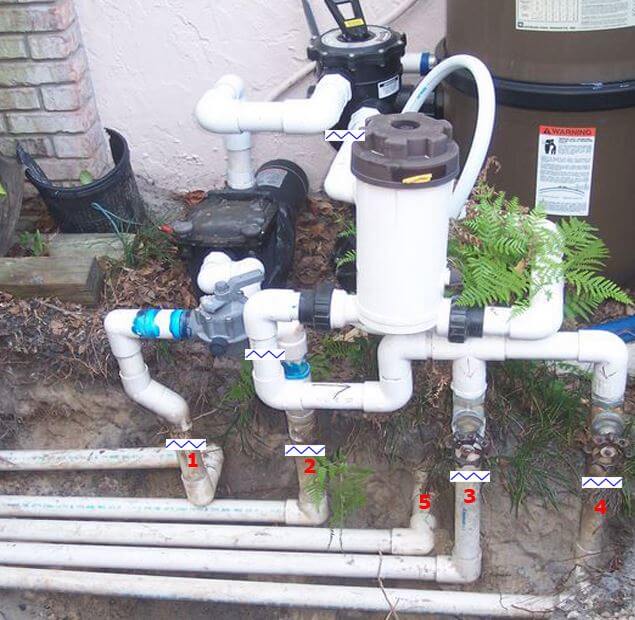
1. Cut it Off at the Knees!
With a hacksaw, I would cut the pipes at the points indicated in the picture below. This pool owner didn’t know how to stop the water running out of the pipes, which is why he built the ridiculous ‘Hartford loop’ on the suction side (see above). Unnecessary.
How to Stop the Water. Before you cut the pipes, you’ll want to plug the pool skimmers and returns with expansion plugs, to be able to replumb the pool system, without water running out of the pipes. For the main drain line (pipe #1), if you lower the water a bit in the pool, it may stop flowing out, or try to raise the pipe a bit to quickly attach a coupling and a length of pipe. For impossible situations, a Drain King and a hose can be threaded through the fittings and down into the pipe that was just cut. Turn on the hose and it will hold back the water until you can plumb higher than the pool water level. When complete, shut off the hose and pull out the hose and Drain King.
2. Demolition!
This is the fun part! Unscrew the suction manifold from the pump – that is, after cutting the pipes, twist the pipes that go into the pump, counter-clockwise, to unthread the pipe from the pump. Throw this pipe and valve assembly in the ‘ol trash can.
Unscrew the unions from the chlorinator, and disconnect the small white flex hose from the Polaris booster pump (not visible, but the hose is sticking up behind the chlorinator).
We made 6 cuts through the PVC pipe. You can use a hacksaw, pvc saw, or a powered jig saw or reciprocating saw. When choosing a place to cut, make sure that you are leaving at least 1-1.5 in. of PVC pipe that you can reconnect to with a coupling. That is, don’t cut the pipe right up against a fitting, you need some clear pipe to connect the new plumbing.
3. Plumb the Suction Side
For the two pipes coming into the pump (#1 and #2 in picture), I’ll use one 3-way Jandy Valve, just like in the picture, and about 3 fewer 90 degree elbows. All of these extra elbows add a lot of resistance to the circulation, and it’s best to use as few 90’s and 45’s as possible.
For fittings, we’ll need one Male Threaded Adapter (MTA), two Slip Couplings, and two 90’s, all 1.5 in. fittings. We’ll also need a few feet of 1.5 in. PVC pipe. For supplies, I’ma gonna need some Teflon tape, PVC primer and PVC glue. For tools, bring a measuring tape and a good set of hands. Be sure to use Pressure Fittings, which have a depth of about 1.5 inch. Drain fittings, only have about half that depth, and are not suitable for pool plumbing.
Start by wrapping the MTA with several (3-4) clockwise wraps of Teflon tape around the fitting threads. For a stronger seal, first smear some Silicone into the threads before wrapping in Teflon tape. Thread the MTA into the front of the pump until it’s hand tight. Give 1 to 1.5 more turns, but don’t overtighten (especially on the Hayward Superpump), or you may crack the inlet port of the pump.
After carefully measuring, dry fit the suction manifold together, with the 3-way valve, 90’s, couplings and MTA all joined together with lengths of pipe. With a 3-way valve, you can insert 1.5″ pipes inside of the valve, as was done on our case picture above, or you’ll notice in the new plumbing configuration picture, larger 2 inch 90’s were used, which are glued onto the outside of the valve ports. This will allow for 10-20% more water flow into the valve, and into the pump.
Glue Time! When ready to glue everything together, use some emery cloth or sandpaper to clean up the old pipes that were cut, then right before gluing, use the PVC primer or cleaner on both the pipes and the inside of the fitting. After cleaning, open a fresh can of heavy duty PVC glue (clear looks better than blue glue!), and apply liberally to both pipe and fitting. Push together with a twisting motion, and hold each connection together for about 15 seconds. Start your priming and gluing at the pump, so that your last glue connection is to both vertical pipes, at the same time.
4. Plumb the Return Side
The return side is a bit more complicated, because we have to also account for the chlorinator and the Tee fitting that feeds the Polaris booster pump (pipe #5). The chlorinator should be installed after the Polaris booster pump Tee, so that highly chlorinated water is not fed directly into the polaris pump. It’s also recommended to have the chlorinator installed lower (closer to the ground) than the Tee, and lower than the pipe that comes out of the multiport, so that the chlorinator won’t back up, and drain into either booster pump or multiport.
After making the cuts on pipes #3 and #4, and making the cuts before and after the chlorinator, we can map out a new plan, to come out of the multiport valve and into a Tee fitting, with the 3rd port facing downward. Using a reducer fitting, to reduce the downward facing port from 1.5 in. slip to 3/4 in. threaded, using a 1.5 x .75 reducer bushing – slip (smooth) on the outside, and threaded 3/4″ on the inside.
After the Tee fitting, use two 90’s together to lower the pipe a few inches and run it into the chlorinator. This Hayward chlorinator is going to be rather large and require about 12 inches of pipe space. If the customer wouldn’t mind, I would substitute with a new Pentair chlorinator, which only requires a few inches to mount, or use an offline chlorinator that could be set on the ground.
After coming out of the chlorinator, the pipe would then run into a new 3-way Jandy Valve, to substitute for the two ancient brass ball valves (which are at least 30 years old!). In the same way that we glued the 2 in. fittings over top of the suction valve ports, we copy the same procedure of cleaning, dry fitting and gluing the pipes and fittings together.

After this replumbing job, your system will look closer to the pool plumbing layout here (if you moved some equipment around, and added a Nature2 purifier!).
Now we have a clean system, with a big reduction in resistance from less turns and twists. It’s also much easier to understand and to operate.
So, if you’ve got a Rube Goldberg pool plumbing mess on your hands, with old 2-way ball or gate valves, consider upgrading this season to a cleaner, faster flowing and easier to use pool plumbing, using Jandy Never-Lube valves, or our comparable 3-way Pentair valves or the old-reliable Jandy Gray valves.