Over the years, I’ve been involved in, or directly built, hundreds of inground pools, most of the them a steel walled pool kit construction, with a vinyl liner. I’ve made a few of my own pool construction mistakes, and now make a living helping homeowners avoid errors in their pool projects. Here’s a list of some pitfalls to avoid when you build your own inground vinyl pool.
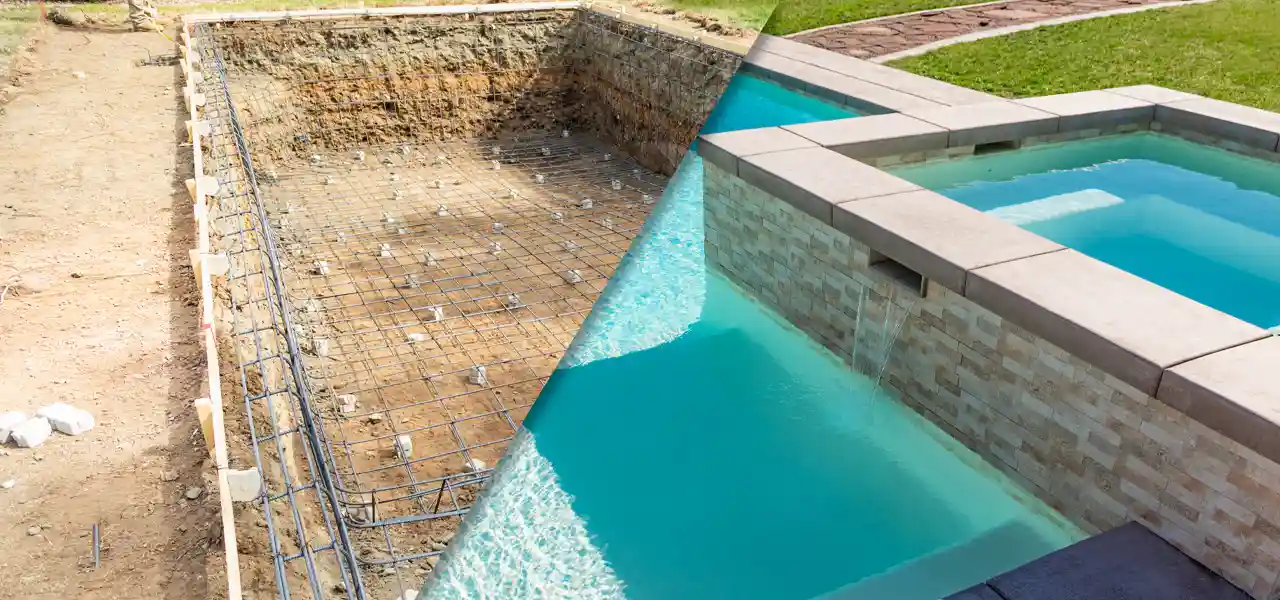
EXCAVATION: When excavating make sure your pool and surrounding land, is at the correct grade for storm run off – around the pool. Have a plan for removing extra fill dirt. it is more cost effective to have a dump truck on site during the digging of the pool, and a nearby location to take extra fill dirt, if you can’t use it in other areas around the pool, after backfilling. do not forget to call811 a week before you dig.
GRADE: Make sure in setting the grade, or level of your inground pool, that you figure in the pool wall height, your coping and your patio so your pool when finished is not too low in the ground or too high, but just enough above surrounding areas to pitch the pool deck away from the pool, 1/4″ for every foot. Storm run-off may require some grading of land around the pool, to pitch water completely around the pool.

WALLS: When installing your pool walls, before you tighten the bolts, make sure your top lip is level and the panels are plumb. A transit level is recommended to check for a square and consistent pool height. Leave the top and bottom wall bolts out at first, to allow for wall adjustments. Once level, connect the A-frame brace and tighten the bolts connecting the panels together. Recheck that pool is level and square before the concrete collar is poured.
CONCRETE COLLAR: When pouring your concrete collar make sure you put in enough concrete around the pool; skimping on concrete risks pool damage down the road. It should be as wide as your overdig, or about 30″ wide, and 10-12″ deep, completely burying the base of the pool walls and partially covering the A-braces. Another mistake is spending too much on concrete. Concrete companies have different quality mixes, but since this is buried, and used for support – have their cheapest mix delivered. Also, do not forget to put rebar pieces, as stakes in the bottom of the panels, before pouring the collar. This will help prevent wall movement as the concrete is poured against the base of the wall.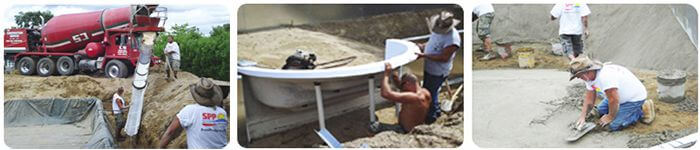
STEPS & SEATS: Another mistake to watch out for is setting the height of your pool steps or buddy seat or swim out. There are 2 types for all of these, bullnose and cantilever. If they are cantilever than they would be flush with the top of the pool wall and then your pavers go on top of that or if you are forming your coping with your concrete deck with forms. The other type is bullnose and to set the height properly for that type put a small piece of your bullnose coping on top of the wall and bring the top of your step up to the same height. Also make sure that you pitch the step slightly lower from front to back.
POOL FLOOR: When finishing your pool floor bottom the most important thing is setting your string lines and making sure your bottom is to the string line level, so dimensions are exact. Secondly, is to spend time to make the floor as smooth as you can get it. If your bottom is rough and uneven, when your pool light is on at night you will see every imperfection in the pool floor.

POOL LINER: One problem to avoid during the liner installation process is to make sure the corners in positioned properly. Make sure a blower/vac or powerful shop vac is used to set the liner and leave it running while the pool is filling, until the shallow end has a few inches of water. I also advise not to cut out anything such as the step, skimmer or returns until you get water right below that point, to allow the liner to stretch to its fullest.

BACKFILLING: The biggest mistake in backfilling is not tamping and wetting, or compacting the fill dirt in stages, as it goes in around the pool. This leaves you wide open for settling of your pool deck down the road. If you are using all stone or gravel that doesn’t need to be compacted. Some folks will “stratify” layers of soil and gravel, a good idea, tamping and compacting between layers. A concrete pool deck will require 4-6″ of gravel on top of the backfill, so be sure not to backfill too high. Water deeply for several days after backfilling, to encourage settlement.

EQUIPMENT: The mistakes that can be made in installing your equipment include wanting to place it far from the pool without upsizing the pump and piping. Installing the equipment in the right order (pump, filter, heater, chlorinator) is obviously important, and if the pump is installed more than 1 foot higher than the pool, install a check valve. Be sure that where you plan to place your pool equipment conforms to your building code.
PLUMBING: When connecting your pool plumbing, know the right steps for the different types of connections. On all threaded connections, use a small amount of pipe dope or silicone, wrapped 3x with Teflon tape. For barbed fittings, used with poly pipe, use pipe dope around all the barbs, double clamp the pipe over the barbs, and tighten each clamp in opposite directions. Then with a torch, give a little heat to the black pipe and you should be able to give the clamps another turn or two. For rigid or flexible PVC, make sure you use a good PVC cleaner first on both the pipe and the fitting, right before gluing. Quickly PVC glue both, push the pipe into the fitting with a twist and hold for 15 seconds. Keep a rag handy to wipe up excess glue.
ELECTRICAL: The biggest mistake I see for DIY pool builders, on the electrical is the grounding and bonding. Find out what your inspector requires and do it that way, and you’ll save a lot of headaches. Also, when installing a wet niche pool light, stub up the pvc conduit at least 12″ above the deck level, into a proper junction box. When wiring your equipment, most pumps and heaters come pre-wired for 220 volts, and can be converted to 110 volt if needed. Wiring the wrong voltage can damage the equipment.
Of the many phases of pool construction, the purchasing phase – when you buy your inground pool kit, has certain pitfalls to avoid. Here’s a quick list of the 5 mistakes to avoid when buying and building your own inground pool.
5 Ways to Buy the Wrong Inground Pool Kit
- Permit or Inspection problems.
- Wrong coping choice for pool deck.
- Ordering your Pool Kit too soon, or too late.
- Not having a well thought out plan before purchasing.
- Buying from a low-service company, when you need lots of help.
1. Pool Permit or Inspection Problems
Before you actually purchase your inground pool kit, you should visit your Town Hall or City or County building and zoning division about getting a permit for an inground pool. Every town or county has their own regulations for installing a pool. Check on the property line setbacks – most pools have to be inside your property line by at least 10 feet.

POOL LOCATION: Spend time to choose the best location for your pool. You have to show on a plot plan the pool location and changing this location after you have your permit in hand may require a new drawing, and/or delays.
Ask what sort of plans & specs they require for the permit – most will have a Pool Permit packet or at least a brochure. You may also find the information available on their website. On the permitting process fill out everything they ask for and nothing more. Sometimes the permit is a generic building permit so there may be questions that do not apply to pool construction. Ask them for information on pool inspections, when and who.
Towns also have regulations about pool fencing, window and door alarms, and may even require a pool alarm. Be aware of all the permit and inspection requirements before the pool kit purchase, it will make it much easier to move ahead. There is nothing worse than purchasing a pool and then finding out that you cannot install it for some reason. Like installing a 4 foot pool fence, and the inspector tells you it must be 5 feet – Big Fail!
For more permit information, see this blog post that Chris wrote on Inground Pool Permits.
2. Wrong Pool Coping Choice

Pool coping is what sits on top of the pool wall, on the inside of the pool. There are 3 different pool coping types, a “Top-Mount” plastic C-channel, which you pour a concrete pool deck right up against, or the “Cantilevered” pool deck forms, which are used to create a floating, cantilevered style deck, with a bullnose concrete edge that overhangs the pool. We also have a “Flat-Mount” coping that is used when stone, brick or pavers are the planned type of pool coping.
To avoid this pitfall – have a complete plan in mind for your new pool area, including the pool deck and patio areas. Or more specifically, which type of pool deck (and thus coping) do you want to install – concrete, stampcrete, stone, brick, pavers, wood…?
Decide ahead of time what type of pool deck you want to put around the pool. When you order the pool kit, you will need to know what type of coping you will need. If you change your mind about what type of patio you want, you can always order the correct type, but it will save time and money by ordering the one you want to begin with.
3. Ordering a Pool Kit Too Soon – or Too Late

Ordering too soon simply means that you rushed into a pool shape or size without checking into property setbacks, or considering storm run-off or drainage. It also means that you may not have time to research all of the pool equipment options or pool deck options for the pool, before purchasing a pool kit. Avoid this pitfall by having a complete plan, from layout to landscaping, before ordering a pool kit.
Ordering too late, now that’s another problem. If you have hired a pool installer or you are doing the pool yourself, make sure you order the pool early enough so that everything is delivered before you start on your pool. Ask how long it takes for pool kit delivery, where the pool is shipping from so you can plan accordingly.
If you are going to take time off from work to do this project, you want to make sure everything is there before you start. Once you start getting your pool parts, start checking off the items you have received against the list of what you should receive. If you are missing something, let them know quickly.
Contractors that you may hire to help with excavation and electrical are most busy March-September. Have a well-organized calendar and plan for the different phases of inground pool construction, to keep things moving and prevent delays.
4. Not Having a Well Thought-Out Plan Before Purchasing
This idea has been mentioned a few times already, so I won’t dwell on it – but you should have a complete plan, before ordering a pool kit and equipment. From soup to nuts – start to finish; and it should all be down on paper. Here’s another blog post on keeping yourself organized during a DIY inground pool construction project.
5. Buying From a Low-Service Company, When You Need Lots of Help
There are varying degrees of service available among online pool kit dealers. In The Swim is a high-touch, high-service pool kit dealer. We all have a deep knowledge of pool kit construction, with over 100 combined years of actual pool installation experience. That’s our added value.
Other dealers do not specialize in service after the sale. They may have a cheaper price up front for the pool kit, because they do not need to hire experience, they can hire order takers. Consider how much assistance you are going to need – you may need more than you think. We offer unlimited support, Monday thru Friday, by phone or email.
In addition to service, you also want to make sure that you are buying a good quality pool. I had a customer recently who purchased a pool kit package from some online shop. After one week the filter system shut down. It ended up being a filter system manufactured in China. They could not get any parts for 3 months. We ended up recommending a Hayward system. Needless to say, she was very upset after spending thousands of dollars on a pool and getting a very cheap filter system. Ask questions of your inground pool kit dealer!
Bonus Tip: Study the Pool Kit installation instructions, before you start. if you have any questions, make a list and be sure to contact your pool representative to go over any questions about any phase of pool construction – before you buy your pool kit and pool equipment – and also before you start each phase of inground pool kit construction.