Second in our series of “All you Need to Know” posts – today we’ll dissect the swimming pool filter to identify problems that a swimming pool owner may encounter, and pose some solutions and prevention that you can put to work.
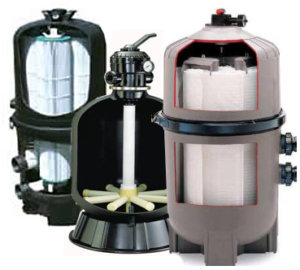
Swimming pool filters, as shown here in our cutaway image, come in three flavors – cartridge, sand and DE, or diatomaceous earth pool filters.
Each pool filter type operates differently of course, and has it’s own unique problems, and completely different parts. Nothing except the pressure gauge is interchangeable.
However, there are some common problems that all pool filters share, in that they are all pressure vessels, and their jobs are all the same, to remove very small particles, and keep the water clean.
Let’s Break it Down ~ by discussing the main parts of each pool filter type and how they interconnect.
Cartridge Pool Filters
The cartridge pool filter is the simplest pool filter design, and out of all 3, it has the fewest parts – mainly because it doesn’t have a backwash valve attached to it. I’m going to estimate that half of all pool filter problems are actually pool filter Valve problems, and no valve means fewer problems!
In this particular cartridge filter, we have 4 -100 sq. ft. cartridges, bigger than many, but the concept of flow is the same. The water comes into the filter tank through the intake elbow (13). The cartridges are held in place by the closure plate (10), which separate the cartridges, but more importantly plugs the ends, to force the water to travel through the cartridges (12), before passing through the bottom collector manifold (16), and exiting the filter tank through the lower outlet (14).
For cartridge filtration to work, the cart must be sandwiched tightly between the upper and lower plates or manifolds, otherwise water can bypass the cartridge.
Like all filters, the tank (6, 17) is under pressure and could blow apart if the clamp (8) were to give way, or if any of the bulkhead parts (20, 21, 22) became loose or crack.
Be sure that your air bleeder assembly (4, 5, 11) and pressure gauge (1) are operating correctly, for safety reasons.
The drain plug (18) on most cartridge filters uses a thick o-ring, which is necessary. You can replace most OEM plugs with SP-1022C as a cheaper alternative.
Replace your filter cartridges (12) after 15 cleanings or so. With each cleaning they lose a bit of their dirt trapping ability, as the fibers weaken and separate.
Sand Pool Filters
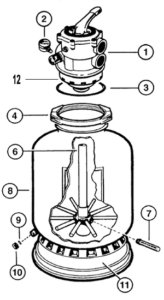
Sand pool filters have a simple to explain concept. The water enters the tank through a distribution baffle (12) to spread the incoming water pressure evenly throughout the freeboard, or space above the sand bed, which fills 2/3 of the tank.
As the water is pushed or forced by the pump to travel through the sand bed, it leaves behind dirt, oils and particles as small as 20 microns. A sand filter that’s a little bit dirty actually filters better than one that has just been cleaned. When the water reaches the bottom of the filter tank (8), it it pushed into the laterals (7), which are slotted to allow the water to pass, but not the sand.
The water now begins to exit the tank as it passes through the impeller hub, and travels up the standpipe (6) in the center of the tank where it re-enters the valve, and exits the valve through the return port. When backwashing, the flow is reversed and water flows into the tank from the laterals (7) and exits the tank through the baffle (12).
The multiport valve or MPV (1) in a top mounted sand filter is secured to the tank flange with the clamp (4) and sealed with the o-ring (3). Valve problems usually revolve around the spider gasket on the inside. The Pentair model is a better design in my opinion, with the gasket located on the rotor, or footpad. The valve is held in place by the very important clamp band (4). Replace your pressure gauge (2) if it seems unreliable – they are cheap instruments.
Sand filter tanks (8) are typically roto-molded, especially on smaller sand filters. Larger tanks may use a fiber glass or other spun fiber and resin design. They are built to handle high pressure, but the tank can burst or the valve can blow off, if a valve is closed after the filter, or if the pool wall returns are plugged tightly.
Sizing the pump correctly is very important to prevent blowing the dirt right through the sand bed and back into the pool. If the pump is too large, well-worn channels can develop in the sand bed, which allows dirt to bypass.
If you have high calcium (hard water) or your filter removes a lot of swimmer oils or urban pollution, using a filter clean product every few years can stave off the eventual sand replacement, at around 7 years.
The drain assembly on sand filters differs by manufacturer. In our Hayward example, we have just a drain cap (10) and a gasket (9), whereas Pentair models have an internal strainer assembly, and an external winged plug with o-ring that is used to drain the tank of water.
D.E. Pool Filters
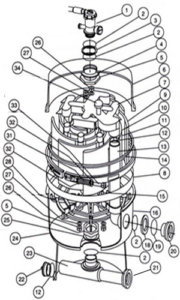
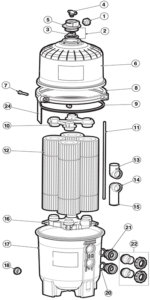
As you can see from our schematic of a DE pool filter that they are indeed a more complicated filter. Many more parts, but just as simple to understand mechanically. The water enters through the bottom inlet pipe or underdrain assembly (23), and is pushed through the filter grids (9, 10) which are coated with DE filter powder. The filtered water leaves the grids as it enters the top manifold (7), and is soon on it’s way out of the filter, via the standpipe (13) and the top bulkhead fitting (20).
For this to work perfectly, the grids have to be tightly sandwiched between the top manifold (7) and the bottom spreader plate (25). This is accomplished by using two long through bolts, a few inches taller than the grids, that are tightened up with nuts on the bottom and wing nuts on the top (26, 27). The entire connected grid set is known as the grid assembly.
Remove and clean the grid assembly once or twice per year, and tighten the nuts if loose. Be careful as you clean it, that it doesn’t fall over, which can crack the manifold (7).
This particular DE filter has an underdrain pipe (23) that combines the incoming water port and the drain plug on the filter. Other DE filter tanks use two holes in the side of the tank, and a separate drain assembly hole in the rear. Note that this drain plug (22) also requires an o-ring (12). Using too much Teflon tape to compensate can crack the underdrain pipe.
Most of the other parts called out in this DE filter diagram have to do with the clamp assembly, and sealing up the 2 holes in the bottom tank half (14) and the one in the top of the top tank half (6). Of note is part number 8, a particularly frustrating part on this old Pentair filter, known as the tank seal retainer (8).
I hope this helps give a better understanding of the way that water moves through your pool filter, to help you better able to diagnose your pool filter problems, and order the correct replacement pool filter parts!